Eclypse Z7 Git Repositories
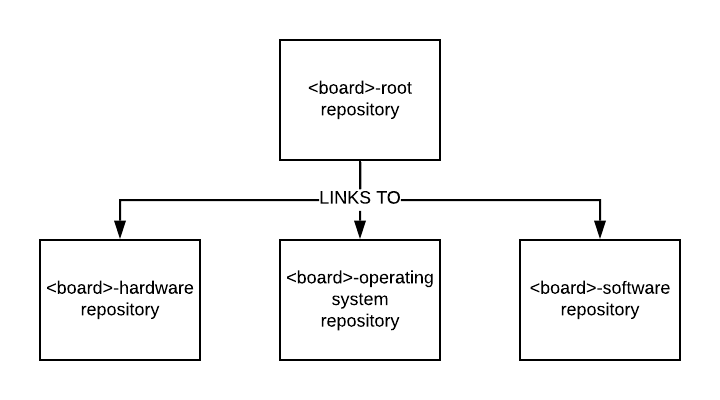
All Digilent-created Vivado projects (hw), Petalinux projects (os), and Software workspaces(sw) for the Eclypse Z7 are version controlled each in its corresponding repository. A root repository is used to link them together.

This document describes the git workflow for these repositories.
If you already have the repository cloned and want to jump straight to info on how to obtain projects from it and build them, skip ahead to the Vivado (HW) Repositories section.
Branching Model and Naming
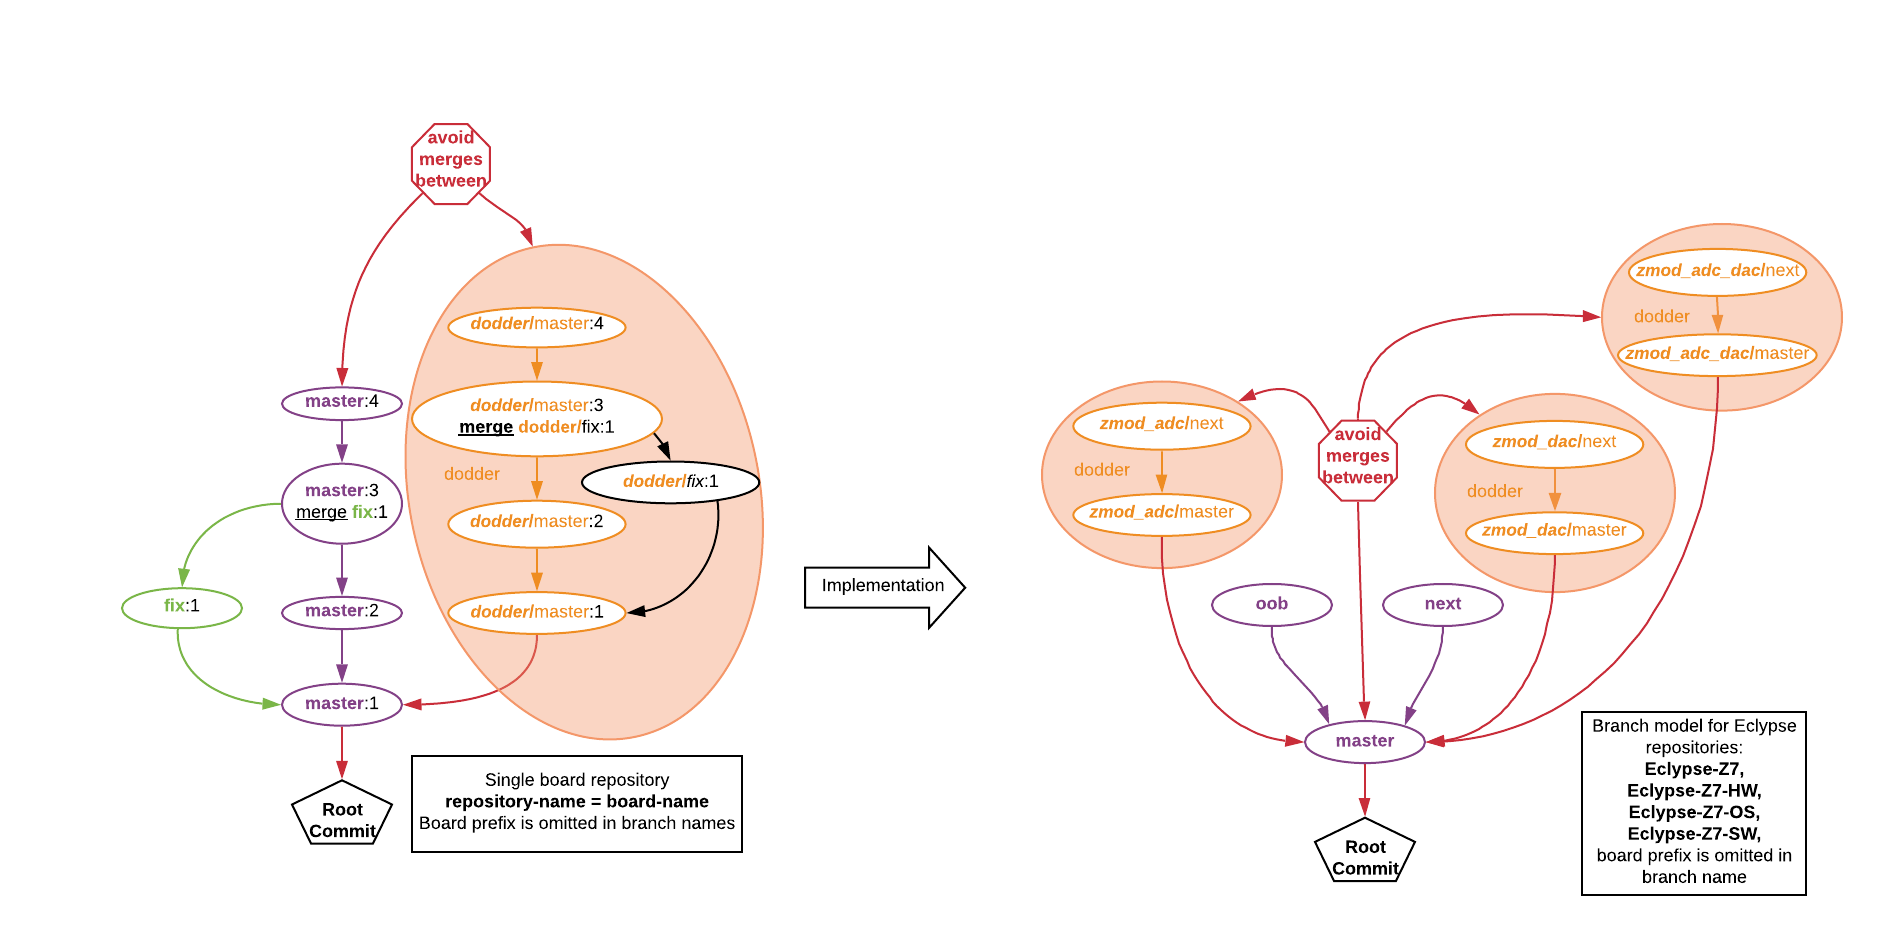
Both topic and root repositories have branches for board(s) and branches for dodders.
Each board branch can have sub branches: (board}/master,{board}/next,board/{topic} ,board/{dodder}/
If the repository manages only one board the {board} prefix can be omitted.
This is not the case for dodder branches: {dodder}/master, {dodder}/{topic}
The name dodder was chosen because of the similarity to the real dodder (cuscuta) vine which depends on a host tree or plant, yet has its own way of growing. In the same way, “dodders” in git are branches designed to hold the development process for an example project or a demo project that depends on board branches, where the resulting changes are never merged back.
A dodder is recognizable by the fact that it branches from {board}/master and has its own master branch.
All four repository for Eclypse Z7 use the same branch model. It is not a hard requirement to have the same dodders in all Eclypse Z7 repositories. An example project for a standalone application will have a hardware design component and a software component. In this case a dodder for this example will be present in Eclypse-Z7, Eclypse-Z7-HW and Eclypse-Z7-SW but not in the Eclypse-Z7-OS repository.
Getting Sources
By cloning the root repository recursively: github.com/Digilent/Eclypse-Z7 we get the following repositories:
github.com/Digilent/Eclypse-Z7-HWfor building a hardware design with Vivado.github.com/Digilent/Eclypse-Z7-OSfor building an operating system with Petalinux.github.com/Digilent/Eclypse-Z7-SWfor building software components with Xilinx SDK.
Each of those repositories can have additional subrepositories.
https
git clone --recursive https://github.com/Digilent/Eclypse-Z7
ssh
git clone --recursive [email protected]:Digilent/Eclypse-Z7.git
Navigating the Repository
The Eclypse Z7 Repository can be obtained by cloning it, either from a terminal, or from its GitHub page.
The master demo repository contains the hardware, OS, and software components of all of the demos within three different submodules. These components may also include submodules of their own. As such, if cloning the repository from a terminal, use the “–recursive” flag:
git clone --recursive https://github.com/Digilent/Eclypse-Z7
Alternatively, initialize and update the submodules after cloning:
git submodule update --init --recursive
Note: The –recursive flag is necessary in order to initialize and update nested submodules.
The components of each demo are contained within separate branches of the repo's submodules.
A demo can be accessed by cd-ing into each component submodule, and calling the following command:
git checkout <demo branch>
Upon checking out a demo branch, to ensure that the repository's submodules target the correct commit, they should be reinitialized and updated:
git submodule update --init --recursive
A list of each available branch can be obtained through the use of the following command, within the component submodules:
git branch -a
Each demo is documented within the README present on its branch of the Eclypse-Z7 repository, and in comments in its software component.
Note: The Software workspaces depend on the Petalinux and Vivado projects, and the Petalinux projects depend on the Vivado projects. Changes to a dependency are likely to require changes to the dependent project or workspace.
Note: As Petalinux is only supported in select versions of Ubuntu, Digilent recommends work done with the Eclypse Z7 Git Repository occur within a supported Linux environment. Windows users may opt for either a dual-boot setup or a virtual machine. More information on requirements of the environment can be found on the Eclypse Z7 Resource Center.
To gain access to a specific demo, clone the root repository targeting the branch containing the chosen demo, as below, where <demo> represents the chosen demo, from one of the demos listed in the table below.
git clone https://github.com/Digilent/Eclypse-Z7 --recursive -b <demo>/master
| Demo | Description |
|---|---|
| base design (master) | A simple Hello World demo with no Zmods or peripherals connected |
| oob | Out-of-Box demo, uses RGB LEDs and buttons with a simple baremetal software application |
| zmod_adc_dac | Supports one each of the Zmod ADC and Zmod DAC |
| zmod_adc | Supports one Zmod ADC |
| zmod_dac | Supports one Zmod DAC |
Vivado (HW) Repositories
Note: As the hardware handoff file is version controlled, the Vivado project does not need to be used in any way to run the demo application
The “hw” folder of the local repository contains the sources of the Vivado Project used to build the hardware design for the demo.
Note: Digilent's Vivado projects require a Vivado install with the board files for Digilent boards. If either of these requirements is not met, first run through the Installing Vivado, Xilinx SDK, and Digilent Board Files guide.
The Vivado project must be recreated from its source before being able to be opened. To create the project, first open the supported version of Vivado1). Open Vivado's TCL console, and enter the command below. This will recreate and open the Vivado project.
set argv ""; source <local repo>/hw/digilent-vivado-scripts/digilent_vivado_checkout.tcl
Once the project is open, the design can be explored and modified, and a bitstream can be built. The project is placed in the local hardware repository's proj folder. When closed, it can later be reopened by selecting Open Project on Vivado's welcome screen and navigating to the .xpr file contained in the proj folder.
Petalinux Project
Details on how the Petalinux projects are version controlled and used can be found within the README.md file placed in the “os” folder of the local repository. These files can also be viewed on GitHub, in the appropriate branch of the Eclypse-Z7-OS repository.
Software Workspaces
The “sw” folder of the local repository is intended for use as a software workspace for Xilinx SDK, and version controls the required project files.
Documentation on how to set up and use the software workspace, both in bare-metal and Linux, can be found in the Zmod Base Library User Guide.
Full Build Workflow and Handoff Files
Changes to the hardware design require that a new hardware definition is exported from Vivado, for use by Petalinux and Xilinx SDK. After generating a bitstream, a hardware handoff file (HDF) can be exported from Vivado through the File → Export → Export Hardware dialog in Vivado. The hardware definition file (HDF) should be placed in the local hardware repository's “hw_handoff” folder, and should contain a bitstream.
These changes can then be propagated to Petalinux by running the following command from within the Petalinux project (the “os” folder):
petalinux-config --get-hw-description=<path to hw_handoff folder>
Changes to the Petalinux project may need to be made, depending on the changes to the hardware design. This is outside of the scope of this document. Detailed instructions for making the changes required to support the addition of a Zmod Hierarchy to a project can be found in the Adding Zmod Support in Petalinux guide.
The Petalinux project must then be rebuilt and repackaged:
petalinux-build
petalinux-package --boot --fsbl <path/to/fsbl> --fpga <path/to/bitstream> --uboot
Changes to the hardware can be brought into Xilinx SDK by right clicking on the hardware platform project and selecting Change Hardware Specification. In the resulting dialog, navigate to and select the “hw/hw_handoff” folder that the HDF was exported into. This process only needs to be done once. Whenever the hardware platform is re-exported, SDK will generate a prompt asking whether the new changes to the specification should be applied.

