Getting Started in Linux Mode with the Analog Discovery Pro (ADP3450/ADP3250)
The Analog Discovery Pro (ADP3450/ADP3250) is able to operate in both Standard and Linux modes. In Standard mode, the device is operated from a host computer running the WaveForms application. While this functionality remains in Linux mode, you are also able to connect directly to the device through a serial connection to operate the device independent of a typical WaveForms host. This guide presents how to get started in Linux mode.
Inventory
- A computer with WaveForms installed, version 3.16.3 or later
- Your Analog Discovery Pro (ADP3450/ADP3250)
- The latest Linux image (v11) for the Analog Discovery Pro 3000 Series is available for download from the My Products section of the site:
- A USB flash drive formatted with a FAT/FAT32 filesystem
Note: The latest Linux image is only require if you intend to update the device's Linux image, as described in step 2 of this guide.
Guide
1. Connect to the Device from a Serial Terminal
This step establishes a serial connection which will be used in later steps. While you may see messages printed during Standard mode boot, no relevant messages will be sent or received until the device boots into Linux mode.
- Connect through a Serial Terminal
-
Make sure that the Analog Discovery Pro is plugged in, powered on, and connected to a host computer via a USB cable. Connect a serial terminal program, such as PuTTY or Tera Term, to the serial port associated with the Analog Discovery Pro at 115200 baud, 8 bits, 1 stop bit, and no parity.
Note: Connecting the device to a serial terminal prior to booting into Linux mode ensures that you won't miss any of the messages printed on boot, including the login prompt.


2. Update Linux Mode (Optional)
While the Analog Discovery Pro ships with a fully functional Linux image included, you may want to update it. Updating your image ensures that you have access to the latest preinstalled packages, drivers, and software that Digilent ships within the image.
- Update Linux Mode (Optional)
-
You can check to see if your device already has the latest Linux image after booting into Linux. Run the following command in the serial terminal and compare it to the latest version listed in the Inventory section.
cat /build_version
If your version is out of date, Digilent recommends updating it before doing anything else in Linux mode, as the process of updating the image will erase work you might have saved in previous sessions.
If you are not on the latest version, or simply want to refresh to a known state, extract the files from the Linux image ZIP download, linked in the Inventory section, above. Copy the usb-image.ub, emmc.img, and deploy.env files to the root directory of the FAT/FAT32 USB drive.

Connect the drive to any of the four USB host ports on the back of the device.

In order to transfer the new image to the device, it will be put into Linux Recovery mode. With the Analog Discovery Pro connected to the host computer by USB, open the WaveForms application. If the Device Manager hasn't opened yet, then select Settings → Device Manager.

In the Device Manager, make sure that your Analog Discovery Pro is selected in the device list, then click on the Boot button and select the Linux Recovery option. Click Apply & Reboot to continue.

Returning to the serial terminal, once Linux has booted on the device, enter the login and password below:
login: root password: root Run the
deploy-to-emmccommand and wait for it to finish. This command writes the Linux image into the device's non-volatile memory, and will take some time (10+ seconds). When complete, it will return to a command prompt. When the device is next booted into Linux mode, the new image will be used.Note: This will erase all data from the device eMMC flash!


3. Switch Modes and Boot into Linux
WaveForms will be used to switch the device from the default Standard mode into Linux mode. This step shows how to perform this mode switch and boot the device.
- Switch Modes and Boot into Linux
-
With the Analog Discovery Pro connected to the host computer by USB, open the WaveForms application. If the Device Manager hasn't opened yet, then select Settings → Device Manager.
In the Device Manager, make sure that your Analog Discovery Pro is selected in the device list, then click on the Boot button and select the Linux Recovery option. Click Apply & Reboot to continue.


4. Log in to Linux for the First Time
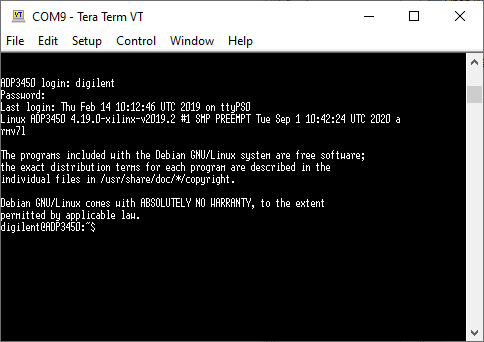
Check the serial terminal to view boot messages. When the device is done booting, you will be met with a login prompt.
- Log in to Linux for the First Time
-
Once the device boots, enter the username and password below:
username: digilent password: digilent Important! This username and password is default to all Analog Discovery Pro devices. In general, but ESPECIALLY if you intend to connect your device to the internet, you should replace this account with your own, change the password, and/or restrict its permissions.
Note that upon login, a “urandom warning” may be printed to the terminal, and can safely be ignored.

Next Steps
You can find an example of Linux mode in action in the Automated Testing in Linux Mode demo, which uses WaveForms SDK from within Linux mode, in order to run scripts directly, without a host.
For more information on using Ethernet and WiFi from the Linux mode terminal, ending with updating packages through apt, see the Connecting the Analog Discovery Pro to the Internet guide.
Other Resources
Check out the Analog Discovery Pro Resource Center for more guides on using your device.
More information on WaveForms SDK can be found on its Resource Center.
For technical support, please visit the Test and Measurement section of the Digilent Forums.