Streaming Data over Ethernet from the Analog Discovery Pro (ADP3450/ADP3250)
Overview
Both Standard Mode and Linux Mode support using WaveForms to communicate with and control the Analog Discovery Pro through Ethernet. You can either set up a direct connection from the device to a host computer running WaveForms, or you can connect both devices to a network, and control the Analog Discovery Pro remotely. This guide presents both methods.
If you want to use Linux mode, but have not yet switched the device away from the default Standard mode, check out Getting Started in Linux Mode with the Analog Discovery Pro (ADP3450/ADP3250).
Inventory
- Your Analog Discovery Pro (ADP3450/ADP3250)
- A computer with WaveForms installed, version 3.16.3 or later
- An Ethernet cable
- (Optional) A local network, with at least a router
Guide
|
Make sure that your Analog Discovery Pro is plugged into your computer via USB. While it won't be necessary at the end of the guide, the USB connection is required in order to initially configure the device's network settings. Plug an Ethernet cable into the Analog Discovery Pro and decide how you want to connect it to the network:
Connecting to a network via a router gives the ADP3450/ADP3250 the ability to connect out to the wider internet in Linux mode. It also allows the device to take advantage of DHCP and avoid you needing to manually select IP addresses for both the host and the device. However, the network latency may be higher and the achievable data transfer rate may be lower, depending on the network configuration. This can limit the amount of data that can be provided to WaveForms and may lower the effective sample rate of the system. You may also need to use the router connection if your computer doesn't have a free network interface that can be dedicated to the Analog Discovery Pro. It should be noted that if you are connecting the Analog Discovery Pro to the network, then anyone on that network can connect to it through WaveForms, unless you set up Authentication. |
|

|
Open the Device Manager by either launching a new instance of WaveForms, or by clicking on the selected device at the bottom of the window, or by selecting it from the Settings menu. |
|

|
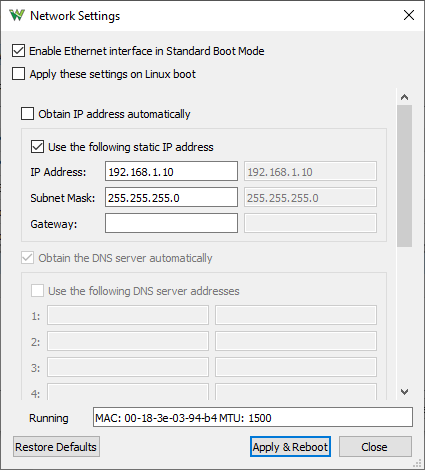
Open the Network Settings for your device by selecting it from the list in the device manager, and clicking on the Network button. |
|

The network settings required differ depending on how your device is connected. Pick one of the two dropdowns below, depending on which method you chose:
- Direct Connection
-
In order to use the ADP3450/ADP3250's Ethernet connection in Standard mode, make sure that the Enable Ethernet interface in Standard Boot Mode box is checked.
If you intend to use the Ethernet connection in Linux mode, check the Apply these settings on Linux boot box.


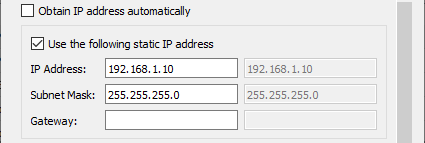
If your device is directly connected to the host computer through an Ethernet cable, then you should set a static IP address on both the Analog Discovery Pro and on the network device of the host computer. For the host computer, methods for manually setting a static IP on the network interface varies with OS, and is outside the scope of this guide. The subnet mask should be left as the default in most cases. The gateway address should be blank if you do not intend to connect out to the internet.
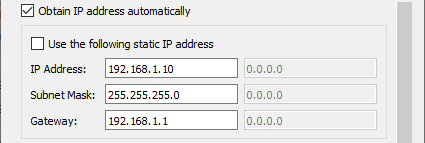
Otherwise, such as if you are connected directly to a router, or connected to a router through an Ethernet switch, then you should have the Analog Discovery Pro obtain its IP address automatically - so as to avoid conflicts with other IPs on the network.
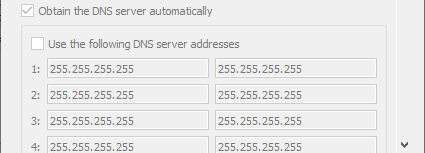
It should be noted that the DNS server settings are not applicable when using Standard mode. When connected to a router, the DNS server addresses should be obtained automatically.
When you are happy with the settings, click Apply & Reboot. This will write the settings into the device so that they will be used whenever it boots into the appropriate modes. The device is then rebooted. You will hear a click.

An example configuration of device and host can be seen in the following dropdown:
- Host Configuration Example: Direct Connection to a Windows Computer
-
In writing this guide, the settings below were used to establish a direct connection between the host computer, running Windows 10, and the ADP3450.
In particular, note that both devices are placed on the subnet “192.168.1”. The segments of the IP where the Subnet mask is 0 are discarded to determine the subnet. The discarded sections, “10” and “11”, then must uniquely identify the two devices.


- Connection through a Local Network
-
In order to use the ADP3450/ADP3250's Ethernet connection in Standard mode, make sure that the Enable Ethernet interface in Standard Boot Mode box is checked.
If you intend to use the Ethernet connection in Linux mode, check the Apply these settings on Linux boot box.
If you are connected directly to a router, or connected to a router through an Ethernet switch, then you should have the Analog Discovery Pro obtain its IP address automatically - so as to avoid conflicts with other IPs on the network.
Once successfully connected to a network, the greyed out boxes on the right will show the currently assigned values to the Analog Discovery Pro.
It should be noted that the DNS server settings are not applicable when using Standard mode. When connected to a router, the DNS server addresses should be obtained automatically.

When you are happy with the settings, click Apply & Reboot. This will write the settings into the device so that they will be used whenever it boots into the appropriate modes. The device is then rebooted. You will hear a click.


|
The Network Settings window will close as the device reboots. It may take some time for the Ethernet connection to be established. Once it connects, you will see an additional device entry, labeled “ETH:ST” (or “ETH:LX”, if you are in Linux mode), with the same serial number as the USB connection. You can now select the Ethernet connection as your device instead of the USB connection and operate your Analog Discovery Pro wholly through Ethernet. |
|

As seen below, when the USB cable is disconnected, the Ethernet connection remains:
|
|
|


|
Finally, with the Ethernet connection running, you can begin using the instruments as you would over USB. You can always check which connection is being used through the device indicator at the bottom of the screen. Congratulations, you've finished this guide! |
|

Next Steps
For more information on connecting the device out to the internet in Linux mode, check out Connecting the Analog Discovery Pro (ADP3450/ADP3250) to the Internet.
For an example of streaming data up to the cloud, instead of to WaveForms, check out Sending Data to ThingSpeak.com with Analog Discovery Pro (ADP3450/ADP3250) in Linux Mode.
Other Resources
For more guides on how to use your Analog Discovery Pro, return to its Resource Center.
For technical support, please visit the Test and Measurement section of the Digilent Forums.