ZYBOt Guide
Overview
Welcome to the ZYBOt guide, this was created to provide a thorough guide when creating the ZYBOt. This tutorial uses an SD card image to get the ZYBOt working. If you would like to use or modify the source files, you can find them here.
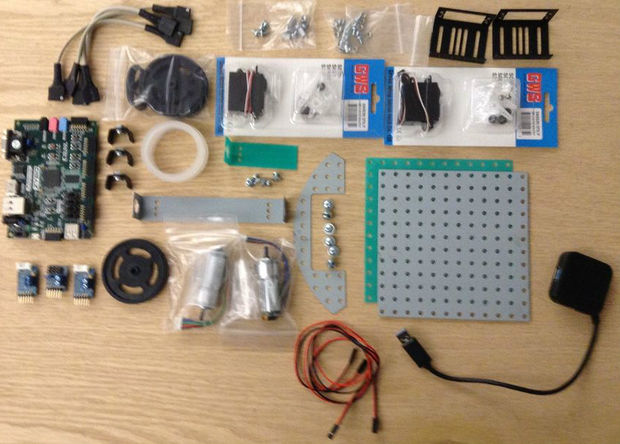
Step 0: The Parts List
Digilent Products
Miscellaneous Parts
Along with the parts that could be purchased at Digilent, there are several other parts will be needed:
- Red Wire
- Black or White Wire
- Electrical Tape
Note: Read thisInstructable before ordering a voltage regulator.
Note: The Drag Button is included in the Digilent Robot Kits, but not sold separately at this time. Ideal drag buttons will have a lift of 2 inches.
- Velcro
- Zip Ties
- 2 3/4 inch screws
- MTE to battery connecter
Note: You may have to do some soldering to make this cable. I needed an MTE because that is what the input of my voltage regulator is and then the special connector my battery has.
Tools
Along with all the parts you need to build the Zybot, you will also need some tools. These tools include, but are not limited to:
- Pliers
- Wire Cutters
- Wire Strippers
- Scissors
Step 1: Dual Booting Windows and Linux
Partitioning your Hard Drive
In order for us to create a MicroSD card that will be used to boot Ubuntu on the ZYBO, we must first dual boot Linux Fedora on our Computer. When setting up a computer for dual-booting, the computer's hard-drive must have a new partition created. This creates space where a new operating system can be installed, while still leaving the old operating system.
Backing up your Computer
First we have to create a back-up of our files; this is a safety measure in case something gets erased in the later steps.
With a Dell Computer, we need to get into Disk Management; other computer manufacturers will have a similar recovery system. To do this in Windows 8.1, hit the Window button on the keyboard, and search “format”. Click on Dell Backup and Recovery to open up system recovery.
User Account Control will ask if you want to make changes to your computer, click on “yes”.
Backing up your computer continued
Partitioning your Computer
In order for us to create a MicroSD card that will be used to boot Ubuntu on the ZYBO, we must first dual boot Linux Fedora on our Computer. First we have to partition the computer hard drive to make space for the Linux System.
We need to get into Disk Management. To do this in Windows 8.1, hit the Window button on the keyboard, and search “format”. Click on Create and format hard disk partitions to open disk management
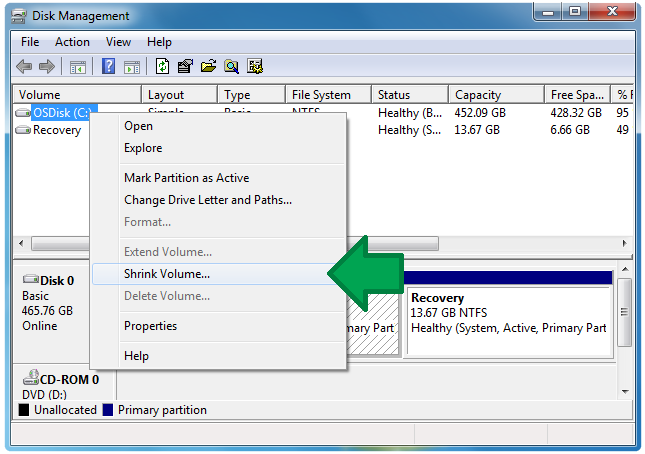
Shrink your OSDisk (C:) volume
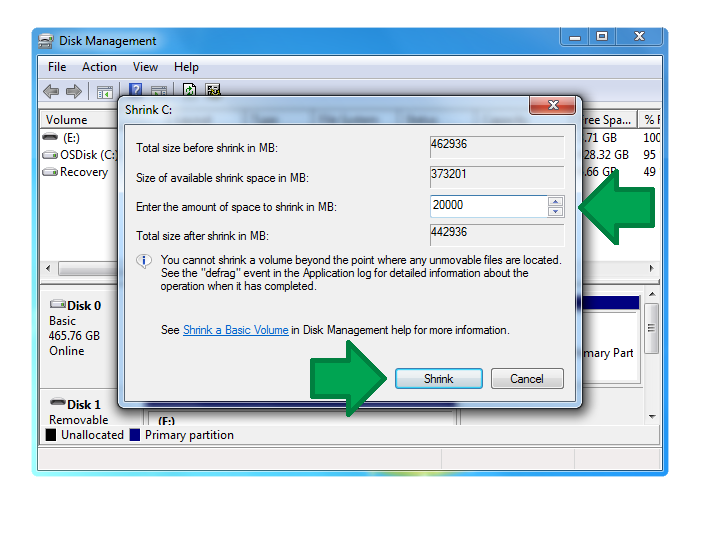
We’re going to shrink the OSDISK(C:) volume by 20 GB. This is where memory loss can occur. If you have less than 20 GBs of empty space, you will lose information, so be careful.
Disk Management determines amount in Megabytes. So we need to shrink the OSDISK(C:) by 20000 MB.
Creating your LiveUSB
In order for us to dual-boot Linux, we have to download a Linux System and put it onto an 8 GB Flash Drive. We have to download a program that will correctly format the System onto the Flash Drive; we call this a “LiveUSB”.
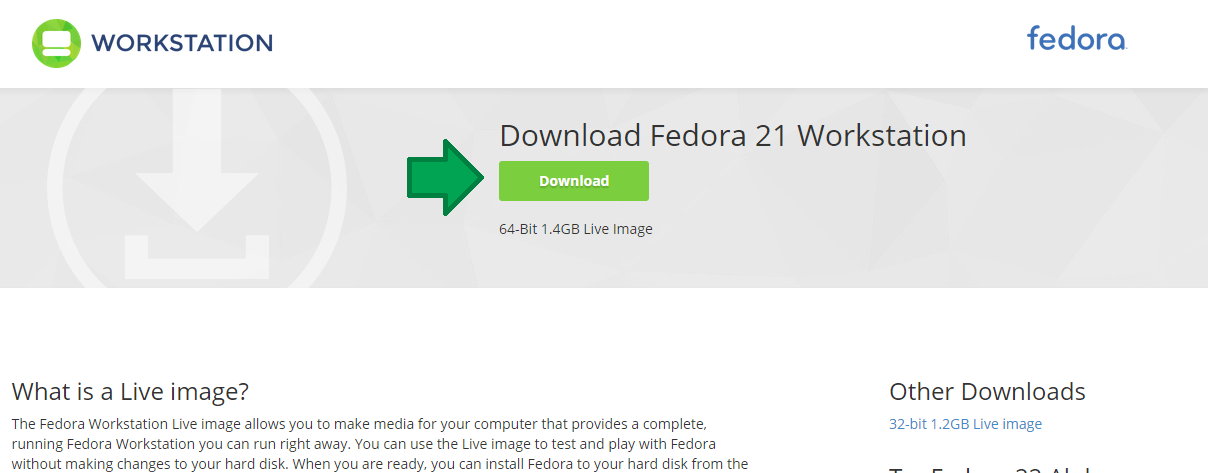
Download Fedora 21 and Universal USB Installer
Go to this link and click on the button to download Fedora.
Click on this link and open when downloaded. This is the Universal USB Installer, and will allow us to load Fedora onto our USB.
Create your LiveUSB
First plug your USB into your computer. Everything on the USB is going to be erased, so be sure to save any files you want to keep.
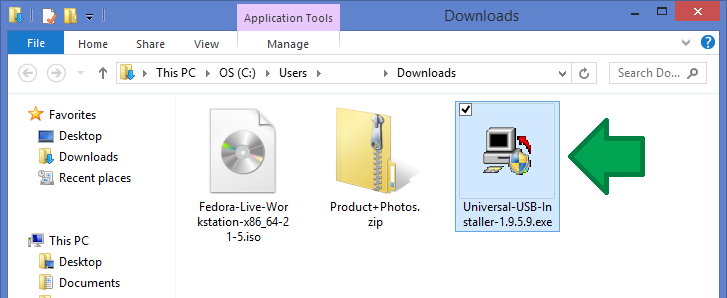
Now go into your Downloads folder and click on the Universal-USB-installer-1.9.5.9.exe file. You may be asked some permission things. After you open the Universal USB Installer program you will see three steps.
Step 1. Select Fedora Live Desktop
Step 2. You need to select the Fedora Workstation we installed. This should be in your Downloads folder.
Step 3. Select the USB drive that you want to use to create the LiveUSB.
Now hit the Create button to make your LiveUSB. You will get a confirmation request before-hand
Setting up your Computer for Dual-booting
Before we can begin installing Fedora onto the computer, we have to change several things on the computer. Windows 8.1 has a feature that protects itself from malware called Secure Boot. This is a great feature, but when we dual-boot, we have to make sure it is turned off.
The boot order must also be changed, when a computer starts up, there is an priority list of how it will boot. In order for us to use the USB, the boot-order must be changed so that the USB-DRIVE is the first thing to be booted.
Turning off Secure Boot
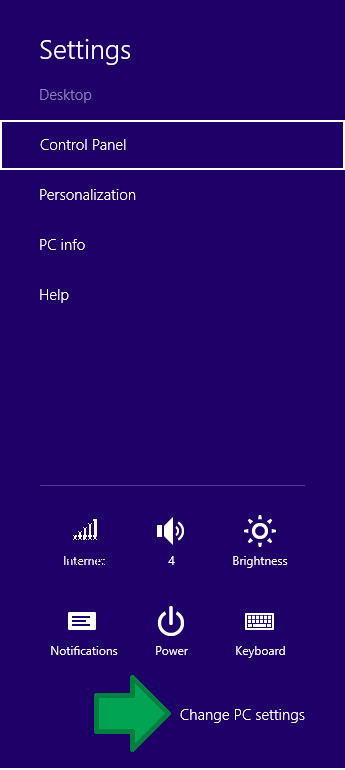
Press WINDOWS+I and select Change PC Settings button
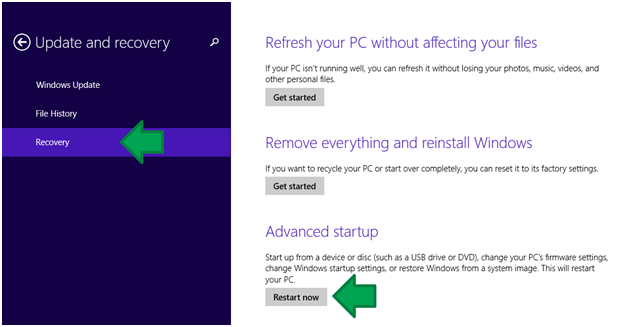
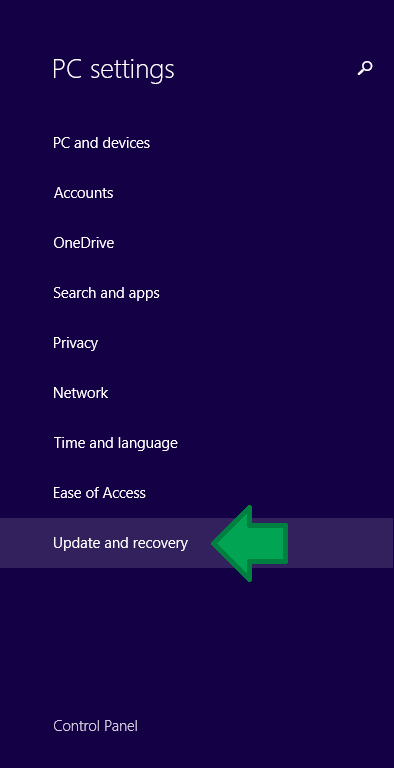
Now click on the Update and Recovery button
 Note: For the next step, if you have Windows 8, you must click on General to get to the Advanced Startup option.
Click on Recovery, and then go to Advanced startup and click the Restart now button. This is going to take us to a new menu, this will shut down everything currently running on your computer, so be sure to save everything you don’t want to lose.
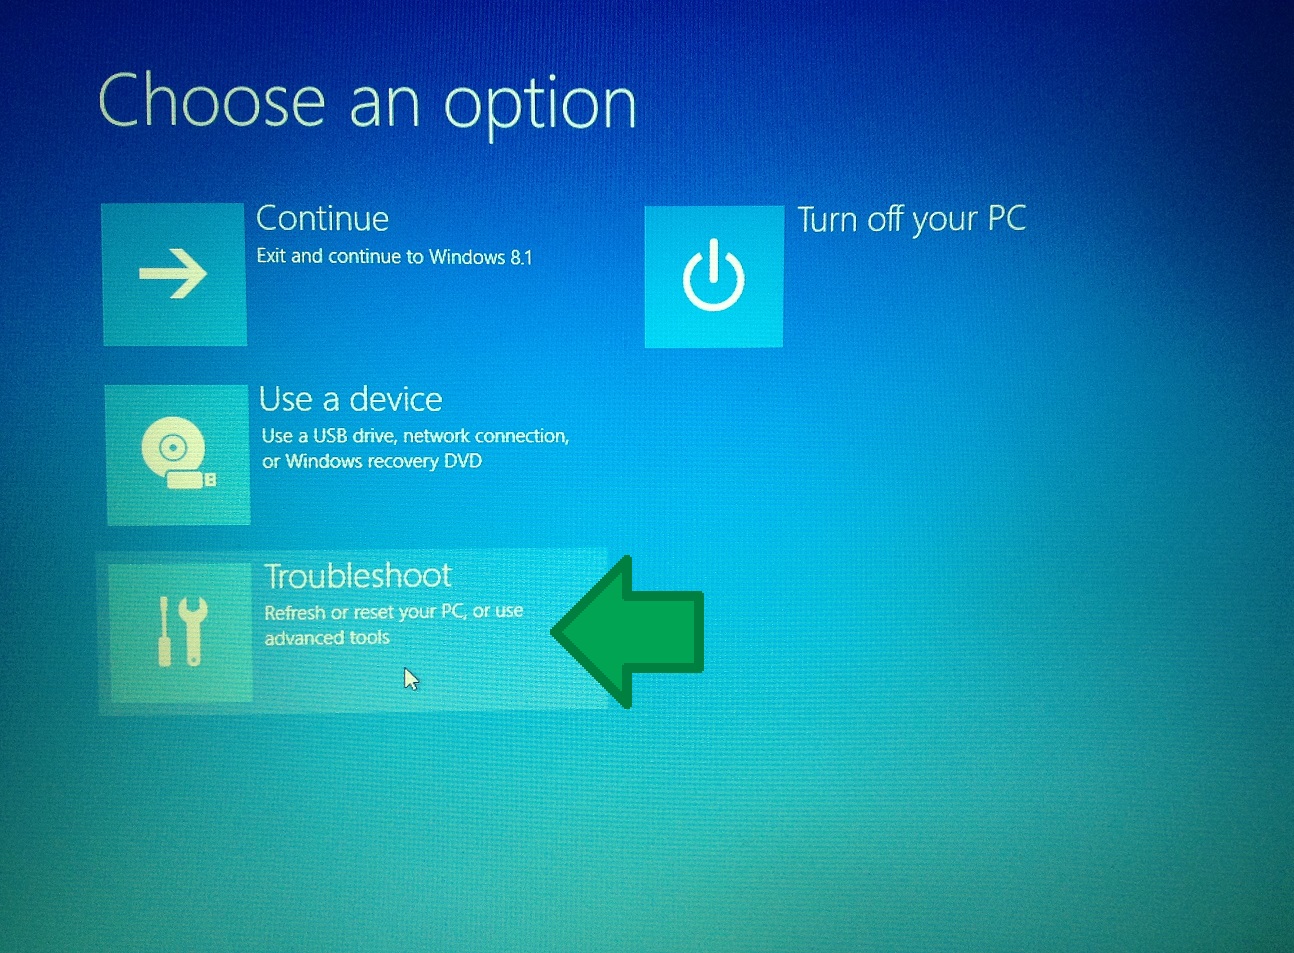
Click on the Troubleshoot button.
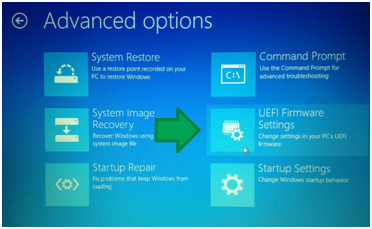
Click on the Advanced options button.
In the Advanced option menu, click on UEFI Firmware Settings.
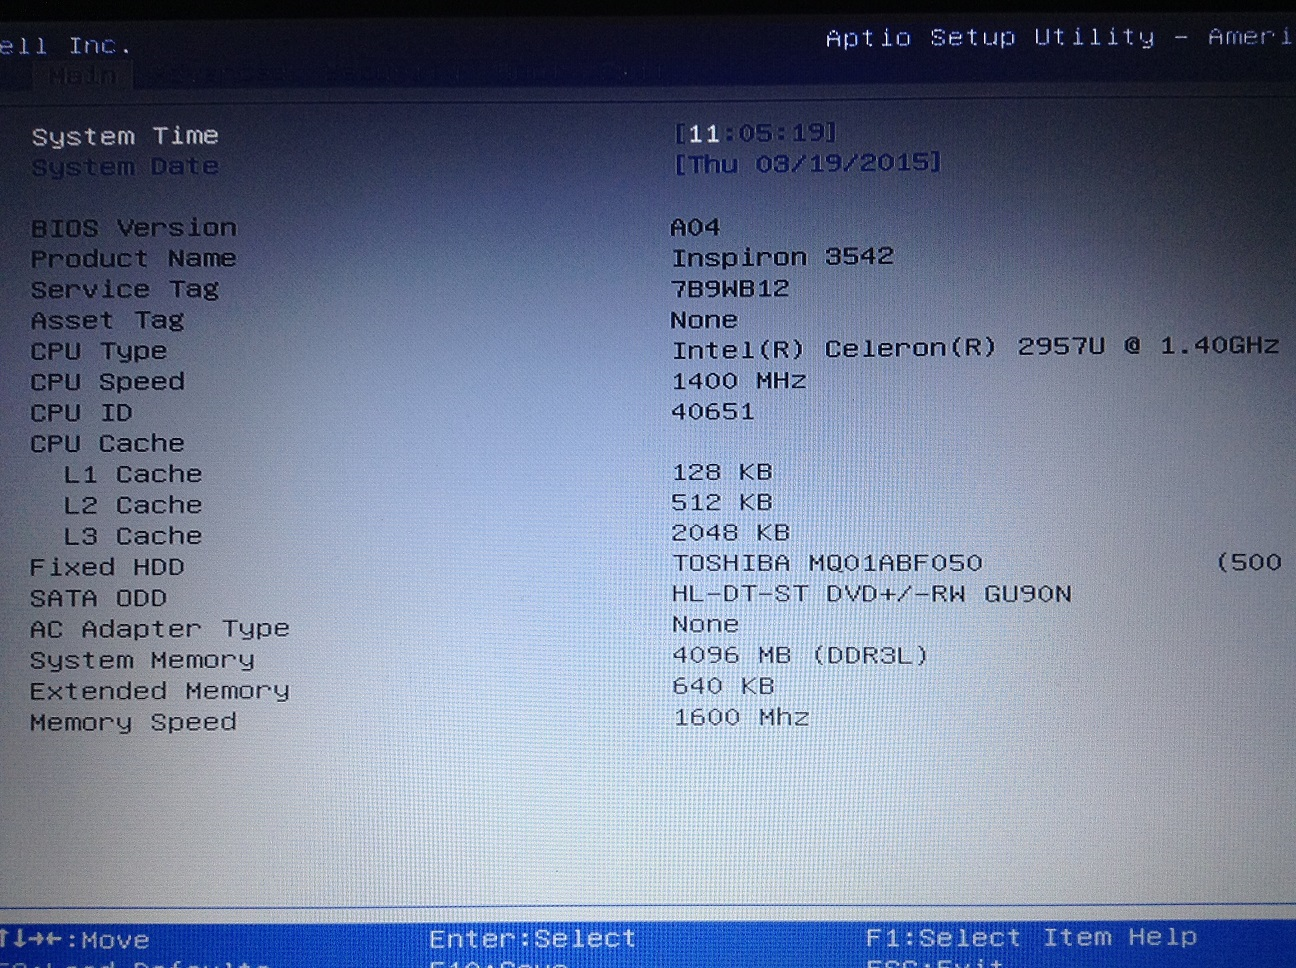
In the UEFI Firmware Settings, we need to click on the Restart button. This will take us to UEFI menu.
This is the UEFI menu. Use the right arrow key to move into the boot menu.
Using the arrow keys, go down to the Secure Boot and hit Enter, then change the Secure Boot to the Disabled option. Now that we have turned off Secure Boot, using the right arrow key, go to the Exit portion. Now save and continue and after your computer has booted up, shut down your computer.
Changing the Boot Order
In order for us to correctly use the LiveUSB, the boot order of the computer has to be changed.
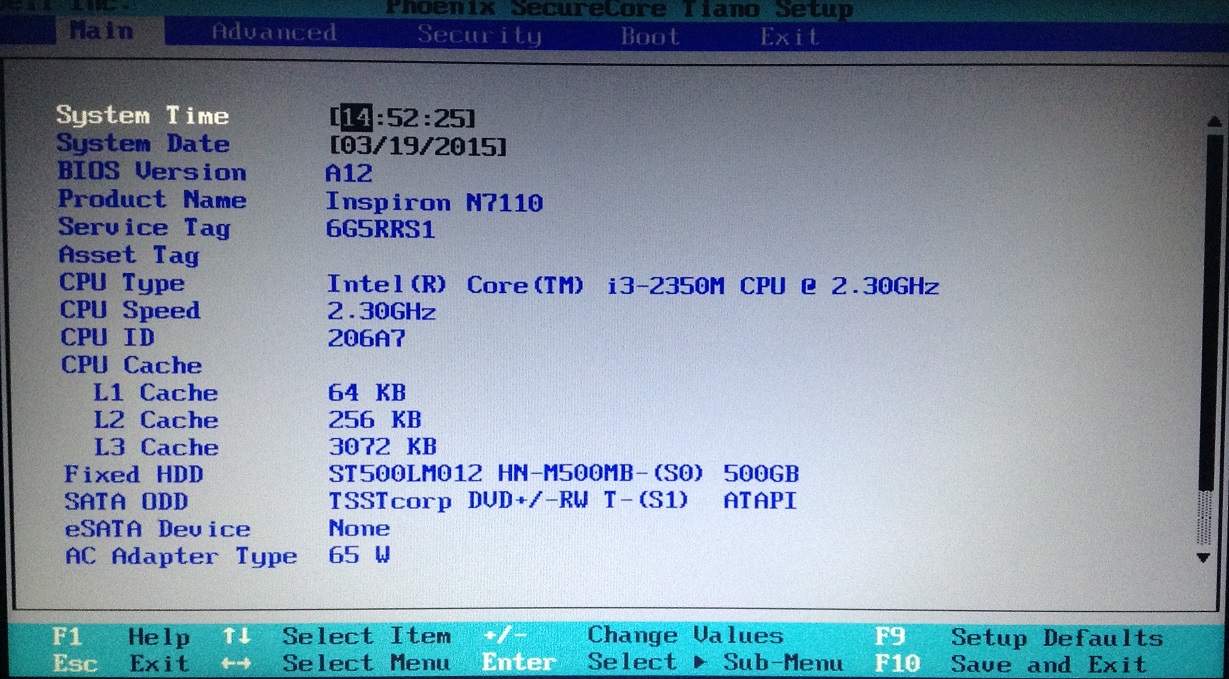
First, when you are turning on your computer, you must press the F2 key to go into the Boot Menu.

When the Boot Menu opens, it will first go to the Main. To get to the Boot options, use the right arrow key.
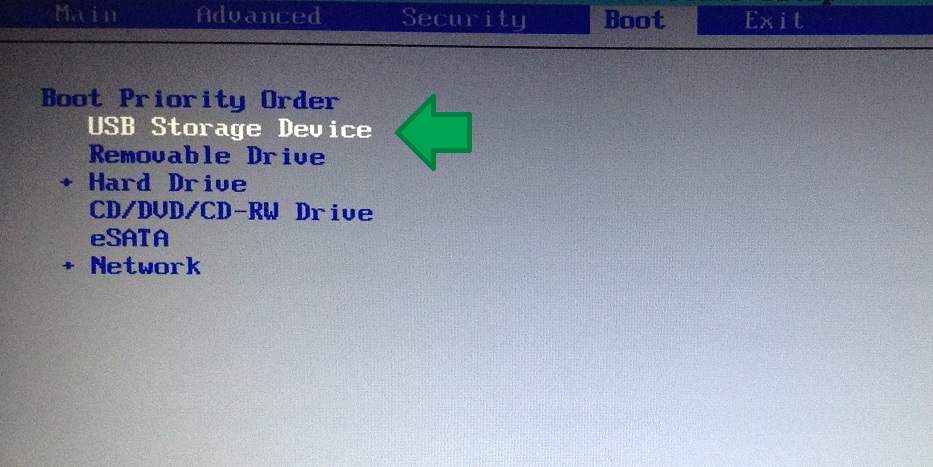
When you get to Boot, use “+” and “-“ to change the boot order. We need USB Storage Device to be the first option in the boot order.
Now that the USB Storage Device is set to be the first boot option, use the right arrow to go to Exit, then press the enter key with Exit Saving Changes.
Shut down your computer
Installing Fedora onto the computer
At this point everything should be set-up to install Fedora onto the computer. The following items should be completed:
- Computer should be backed up.
- The Hard Drive Disk needs to be partitioned with around 20GB of unallocated memory.
- LiveUSB with the Fedora System was created using the Universal USB Installer.
- Secure Boot has been turned off.
- The Boot Order should have USB be the top selection.
Plug the LiveUSB into your computer
Starting Fedora installation
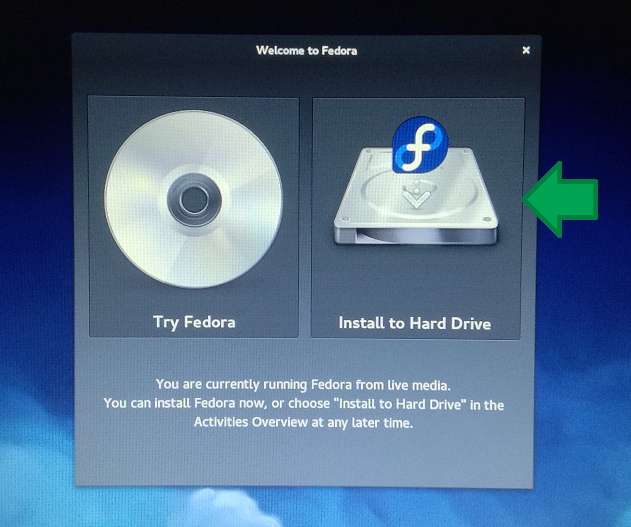
Install Fedora to Hard Drive
Select language options
Choose installation destination
Add Disk
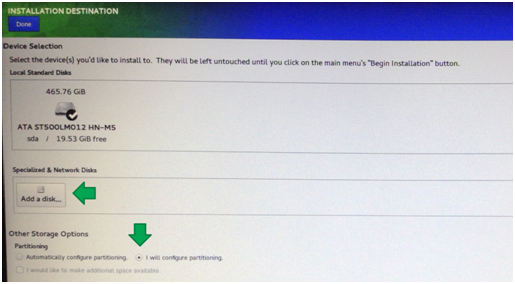
Step 1. In Other Storage Options select the “I will configure” partitioning radio button.
Step 2. Click on the “Add a disk…” under the Specialized & Network Disks section.
Add a memory partition
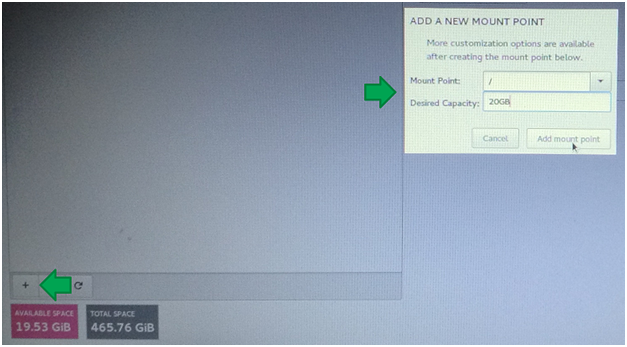
Step 1. Select the “+” option on the bottom left of screen.
Step 2. There will be a pop-up on the screen. Select / as the Mount Point, and 20GB as Desired Capacity. Be sure to select standard partition as the device type.
Step 3. Click the Add mount point button.
Continuing the memory partition
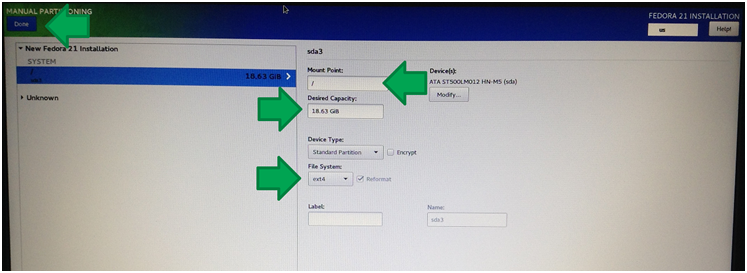
Mount Point: The mount point needs to be “/”, this is the Root of the file system.
Desired Capacity: This should be around the amount entered in the previous step.
File System: The desired file system should be ext4.
Click on the Done button.
Finishing the memory partition
Beginning Installation
User Settings
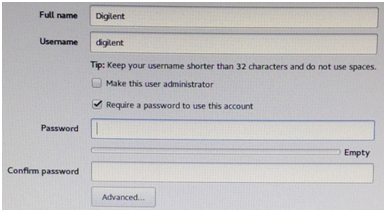
To create you user, click on the USER CREATION button. Choose your desired name option and password. Be sure to remember this password, as it will be needed later. When finished, push the Done button on the top-left corner of the screen.
Set the Root Password and Confirmation. When finished, push the Done button on the top-left corner of the screen.
Finishing Up Installation
After Fedora completes installing (this may take a few minutes), press the Finish configuration button.
Press the Quit button
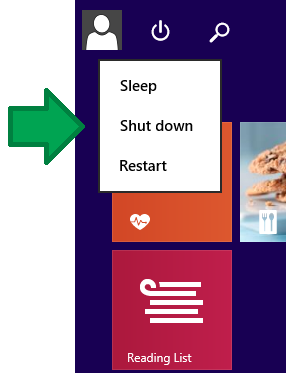
When the Desktop screen of Fedora opens up, use the power option on the top-right to shut down your computer.
Booting into Fedora
Turn the computer back on, and the menu above will open. The Fedora option we want to use will be the first one. You can change the boot option by using the up and down arrow keys. Use the password created in setup to log into your use account.
Step 2: Loading Linaro Ubuntu onto your MicroSD Card
Getting Fedora set-up
Opening up the Terminal
In order to be able to boot Ubuntu on the ZYBO, we need a partitioned 8 GB Micro SD Card that has the Linaro Ubuntu Distribution and the boot files. We’re going to use the Fedora Terminal to partition everything.
Click on the Activities button in the corner, and then type in “Terminal” and click on the button that comes up.
Setting up user permissions
In order for us to access certain commands in Fedora, we need to set our account to be able to use sudo. Enter the command su -, then enter your Root password. Then enter the command usermod yourusername –a –G wheel.
Before the changes can take place, you must log out, and then log back in. Once logged in, reopen your terminal.
Identifying your Micro SD Card Port
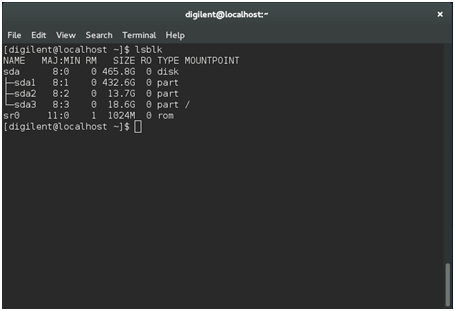
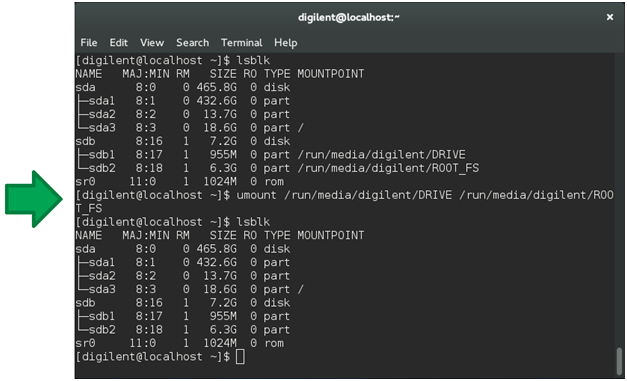
In the terminal, enter the command lsblk. This will display the block devices on the computer.
Note that there are largely two sections: sda and sr0
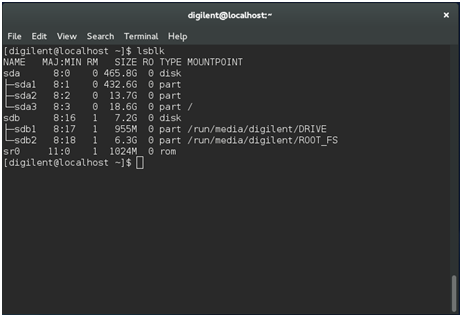
Plug your MicroSD card into the computer and run the command lsblk again.
Now that the MicroSD card is plugged into the computer, you can see that sdb is new. This is going to be our MicroSD card.
Note the MOUNTPOINT of sdb1 and sdb2, these will be important. For this user, the points are /run/media/digilent/DRIVE and /run/media/digilent/ROOT_FS.
Unmounting your Micro SD Card
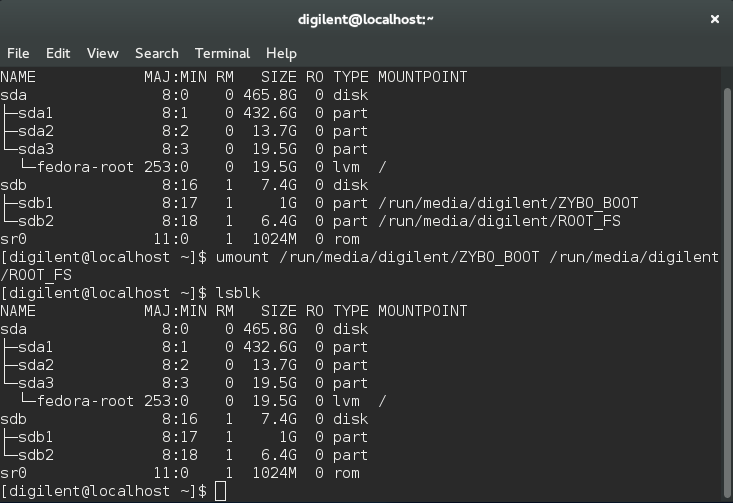
Before the MicroSD card can be partitioned, we need to unmount the entire MicroSD card. To do this, enter the command umount MOUNTPOINT into the terminal. The MOUNTPOINT will change for user. To unmount from the above example, we would enter the command umount /run/media/digilent/DRIVE /run/media/digilent/ROOT_FS.
In order for everything to work correctly, you must unmount all the partitions of your MicroSD Card, this example has two partitions (sdb1 and sdb2). If everything went correctly, the MOUNTPOINTs of sdb will be empty.
Partitioning the MicroSD Card
Run the command fdisk
The fdisk command is going to allow us to partition the MicroSD card.
Enter the command sudo fdisk /dev/sdb. This will open the fdisk menu, next we need to delete the current partitions of the Micro SD card.
Delete current partitions
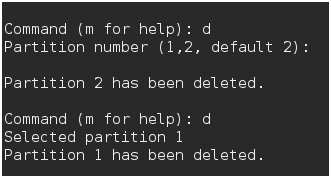
The d command will delete a partition, because all the partitions have to be deleted, you can select defaults and hit enter.
Be sure to delete all the partitions on the MicroSD card.
Writing Partition 1
After all the partitions have been deleted, we need to create 2 new partitions. Enter the following commands to create the first partition.
- n : This will prompt you for a new Partition type.
- p : This will create a primary memory partition.
- Hit enter : This creates default partition number 1.
- Hit enter : This creates the first default sector for memory.
- Type in +1G : This will designate 1 gigabyte for partition 1.
Writing Partition 2
The second partition is much easier:
- n : This will prompt you for a new Partition type.
- p : This will create a primary memory partition.
- Hit enter : This creates default partition number 2.
- Hit enter : This creates the first default sector for memory.
- Hit enter : This will put the entire remaining memory into partition 2.
Writing the MicroSD card
Enter the command w. This will write all the changes to the MicroSD card. Once MicroSD has finished writing, fdisk will close automatically.
Creating the VFAT
Run the command sudo mkfs -t vfat -n ZYBO_BOOT /dev/sdb1.
This will create a File Allocation Table, with the name ZYBO_BOOT.
Creating the ext4
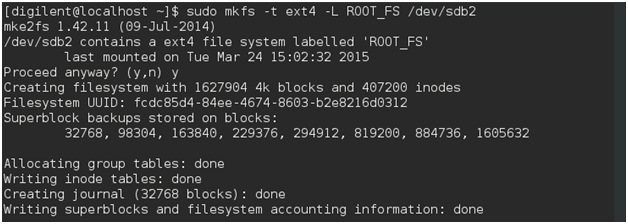
Run the command sudo mkfs -t ext4 -L ROOT_FS /dev/sdb2.
This will create an ext4 file system, with the name ROOT_FS.
Installing and unpacking Linaro
Download Linaro Release of Ubuntu
Download the Release Version of Linaro from this link.
Create Linaro Folder
Copy the filesystem into the linaro folder
Now that we’ve created the linaro folder in Documents, we can copy the file-system we downloaded into the folder. Enter the command: cp Downloads/linaro-precise-ubuntu-desktop-20120923-436.tar.gz Documents/linaro/fs.tar.gz, this will place a copy of the tar file into the Documents/linaro folder.
Checking the linaro folder
After the step 35 has finished, enter the command ls Documents/linaro, this should output fs.tar.gz.
Move into the linaro folder
Unpacking the tar file
Now that we are in the linaro folder, we need to unpack the fs.tar.gz. Enter the command sudo tar zxf fs.tar.gz, this will unpack the tar file and create a binary folder. After it has unpacked, you can run ls and binary and fs.tar.gz should be the output. Enter the command cd to get back into the Home folder.
Setting up the MicroSD card
Unmounting the Micro SD Card (again)
Creating the sd_ext4 folder
Now we are going to start to move the Linaro Distribution onto the MicroSD card. First we need to create a new folder to mount the ROOT_FS partition.
Enter the command mkdir –p Documents/sd_ext4 .
Mounting ROOT_FS to sd_ext4
Enter the command sudo mount /dev/sdb2 Documents/sd_ext4 .
This will take ROOT_FS and mount it to the file we created in the previous step.
Using rsync to copy file system
First enter the command cd Documents/linaro/binary/boot/filesystem.dir . This will take us to the filesystem.dir folder.
Now enter the command sudo rsync -a ./ /home/digilent/Documents/sd_ext4 . The command rsync creates a copy of a folder, but retains all the original permissions. Because of the file size, rsync will take a while (it took around 15 minutes for us).
Unmounting sd_ext4
Now that rsync has finished, we can unmount the sd_ext4 folder.
Enter the command sudo umount /home/digilent/Documents/sd_ext4/. This is going to safely remove our ROOT_FS partition. This is the only way to assure that nothing will be corrupted.
You can click on the ROOT_FS folder, the above picture is what ROOT_FS should look like. If you check out ZYBO_BOOT though, it will still be empty.
Downloading boot.zip
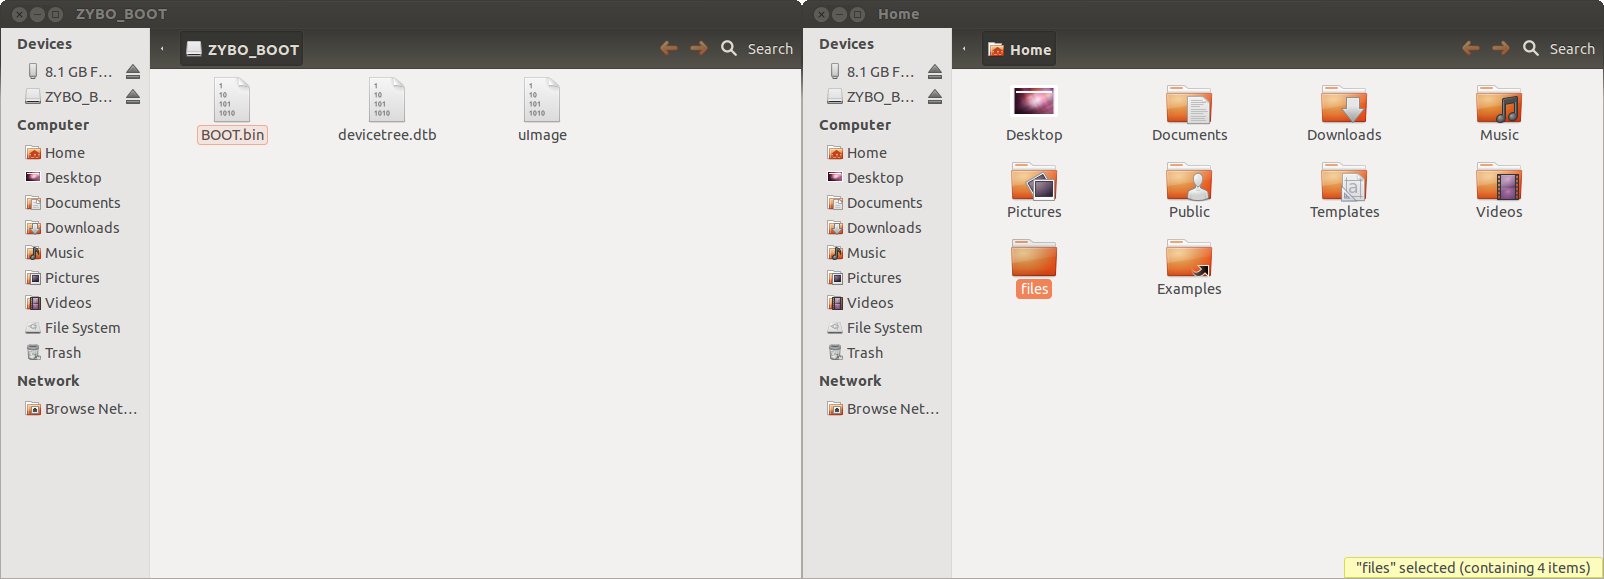
Click on this link, which will download the boot.zip files. Inside this zip file there are three files and a folder. Move all these files into the ZYBO_BOOT Micro SD card partition, the easiest way to do that is to drag-and-drop.
At this point you should eject the MicroSD Card. You can hit the eject buttons, or unmount it using the umount /run/media/digilent/DRIVE /run/media/digilent/ROOT_FS command. This will complete the setting up of the filesystem! Now we can boot Ubuntu onto the ZYBO.
Step 3: Setting up the ZYBO
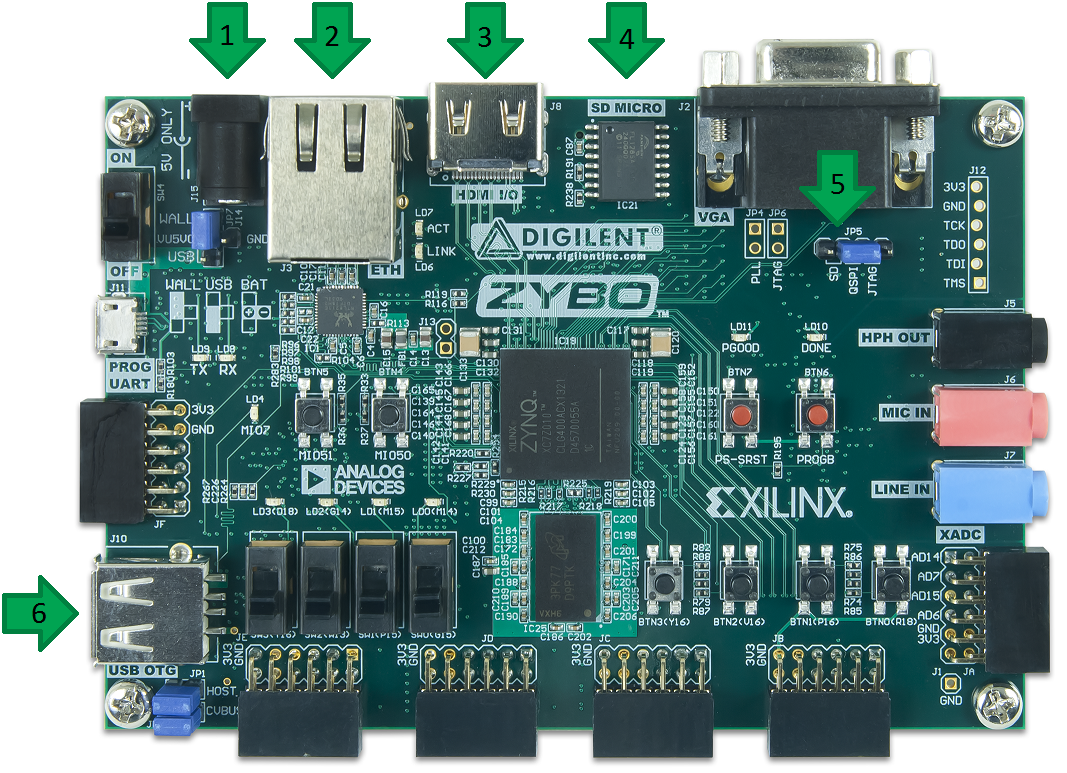
Important ZYBO ports
- Power Jack
- Ethernet RJ45 Connector
- HDMI Sink/Source Connector
- microSD Connector (reverse side)
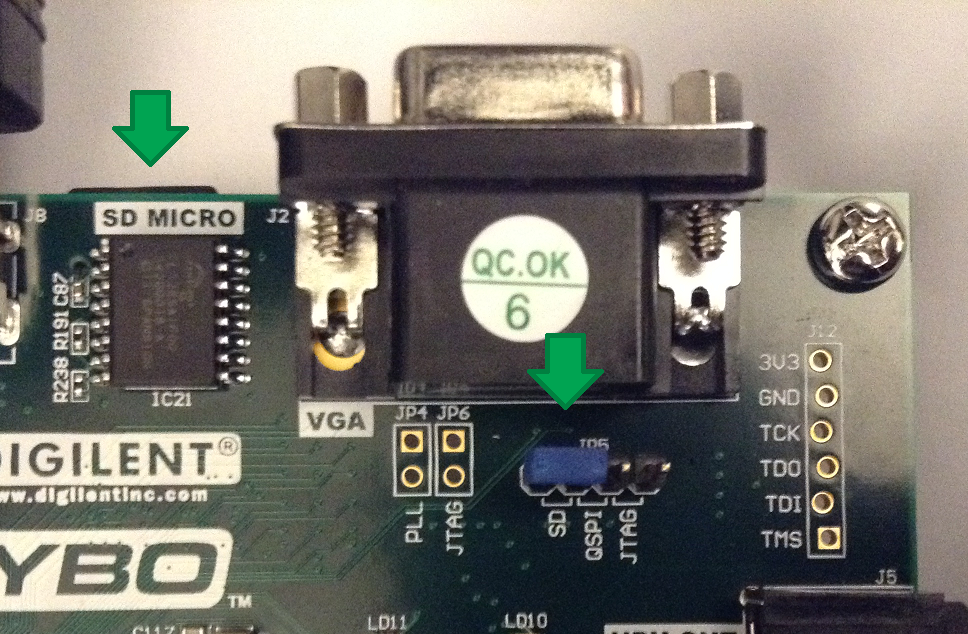
- Programming Mode Jumper (Be sure to move the Jumper Block to the SD pins)
- USB Port
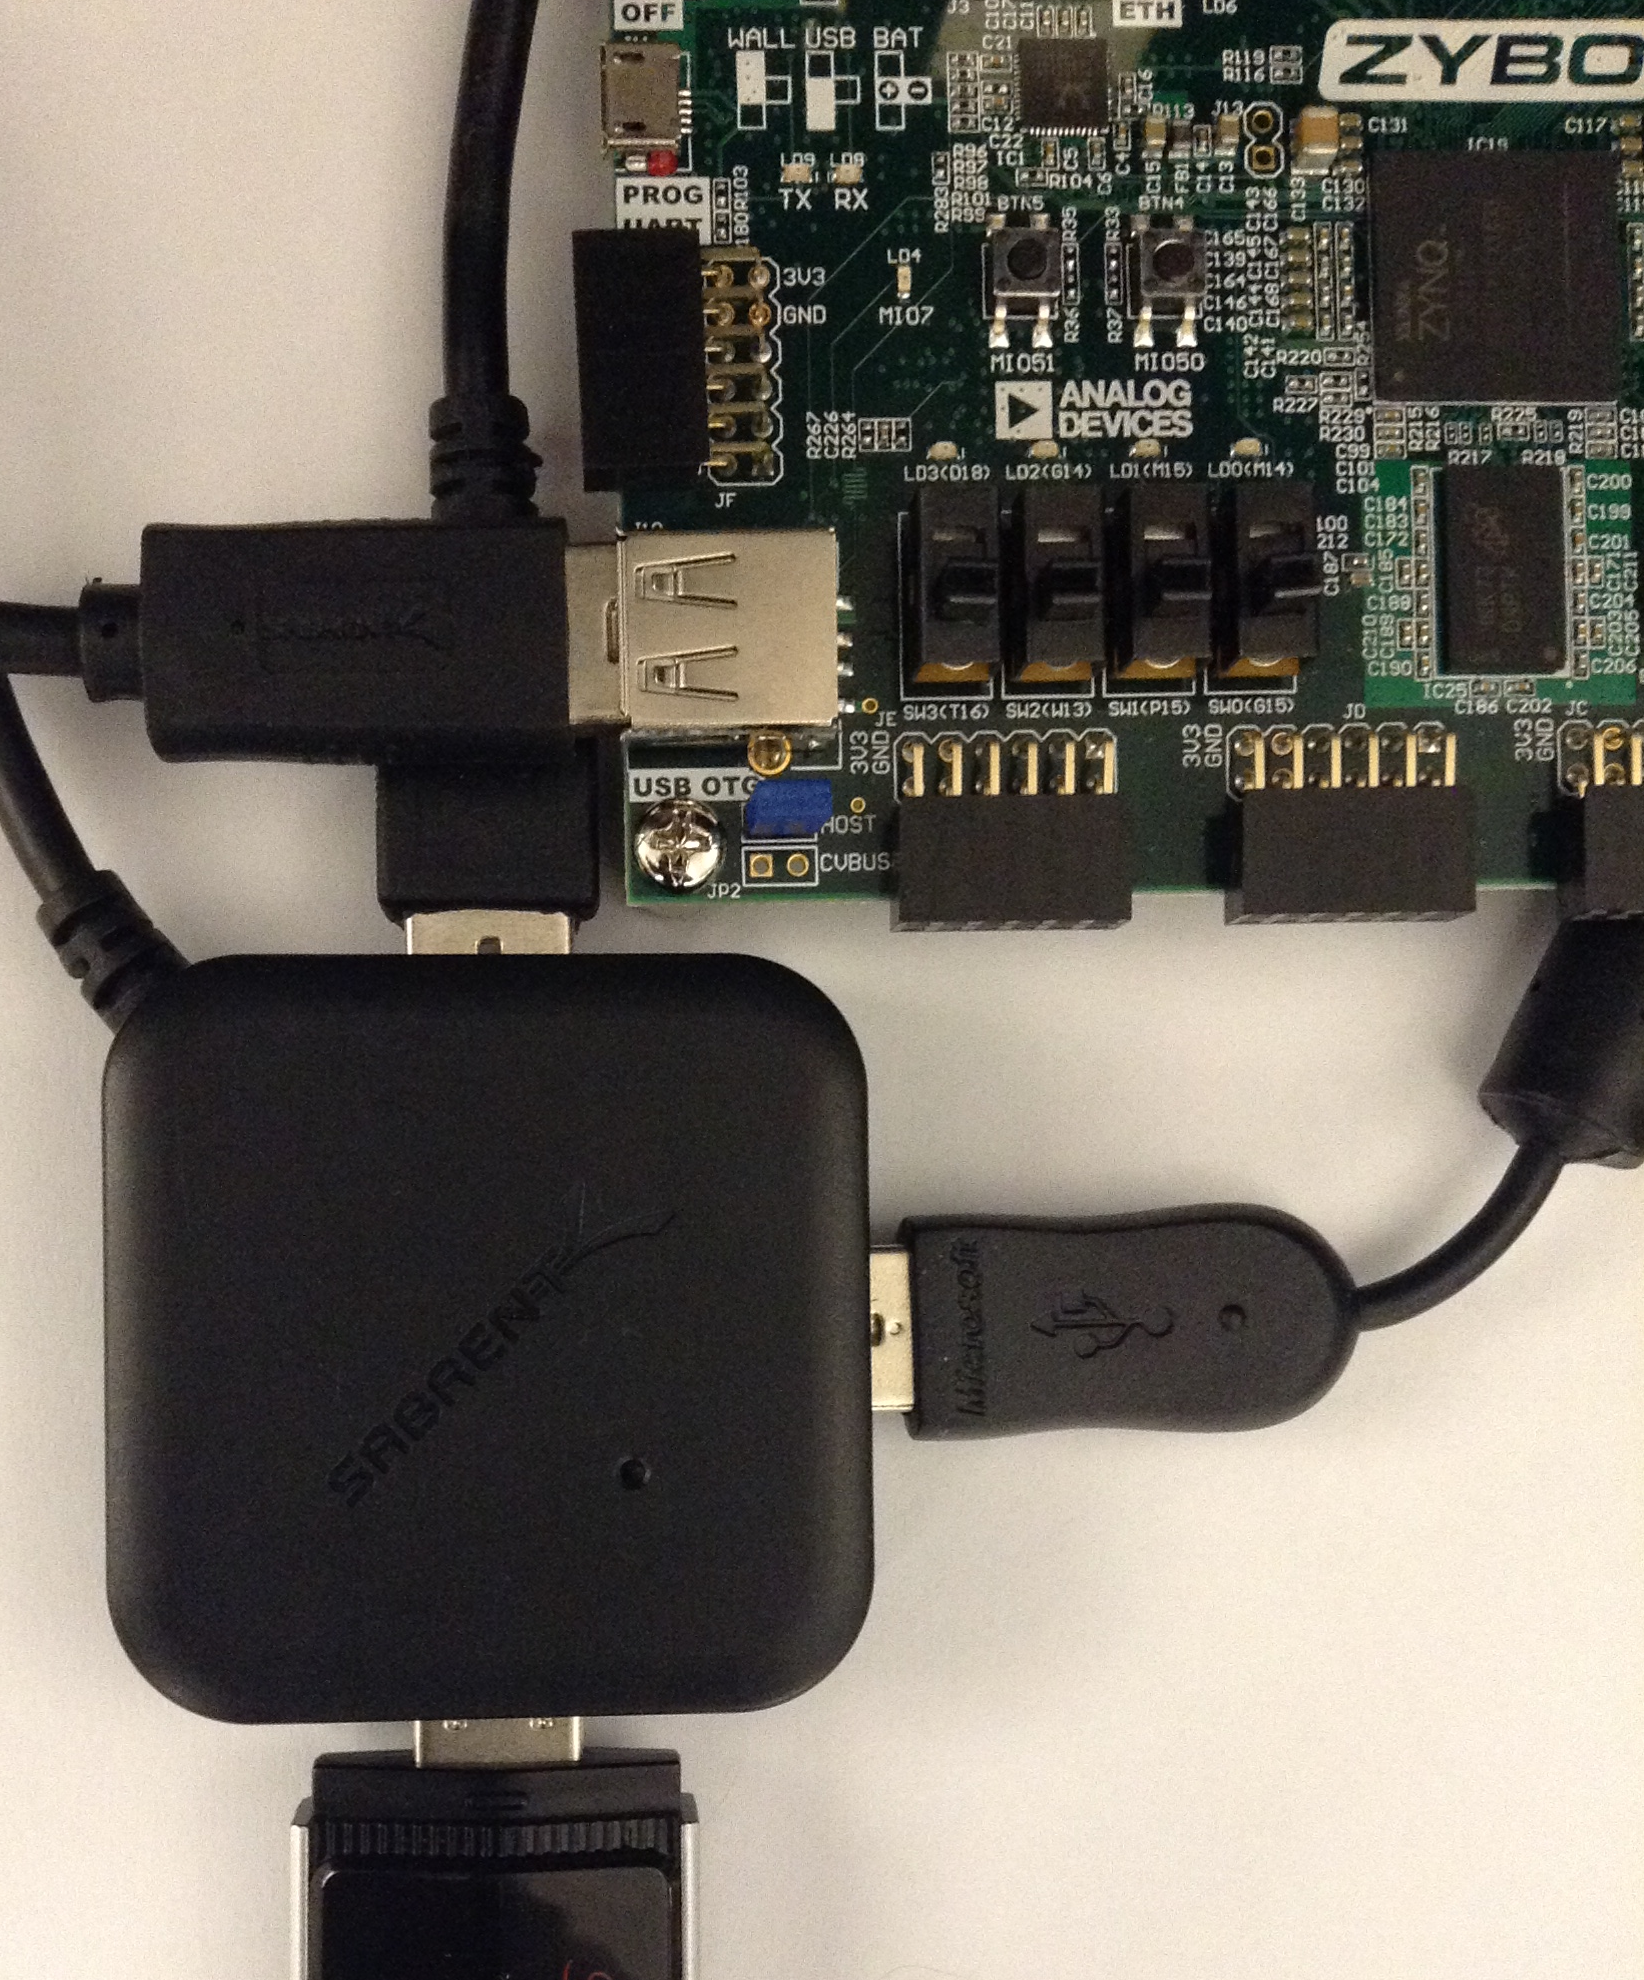
Plugging in the USB
- Plug USB splitter into ZYBO USB port. The splitter needs to have at least 3 USB ports.
- Plug Keyboard, Mouse, and Wifi Adapter into the USB splitter.
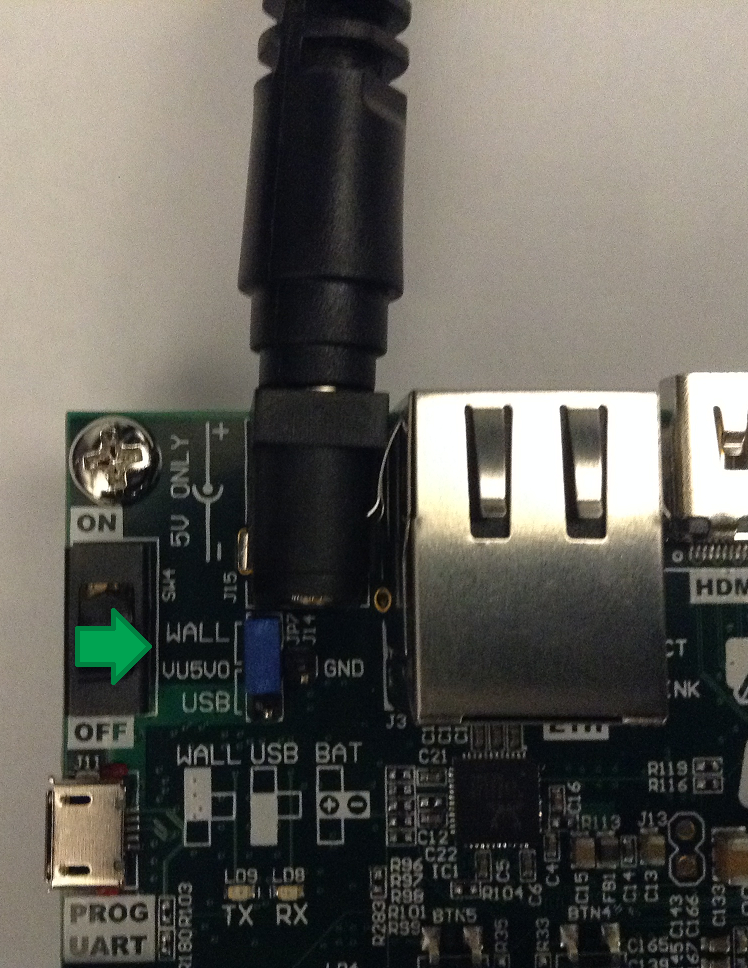
Plugging in the Power
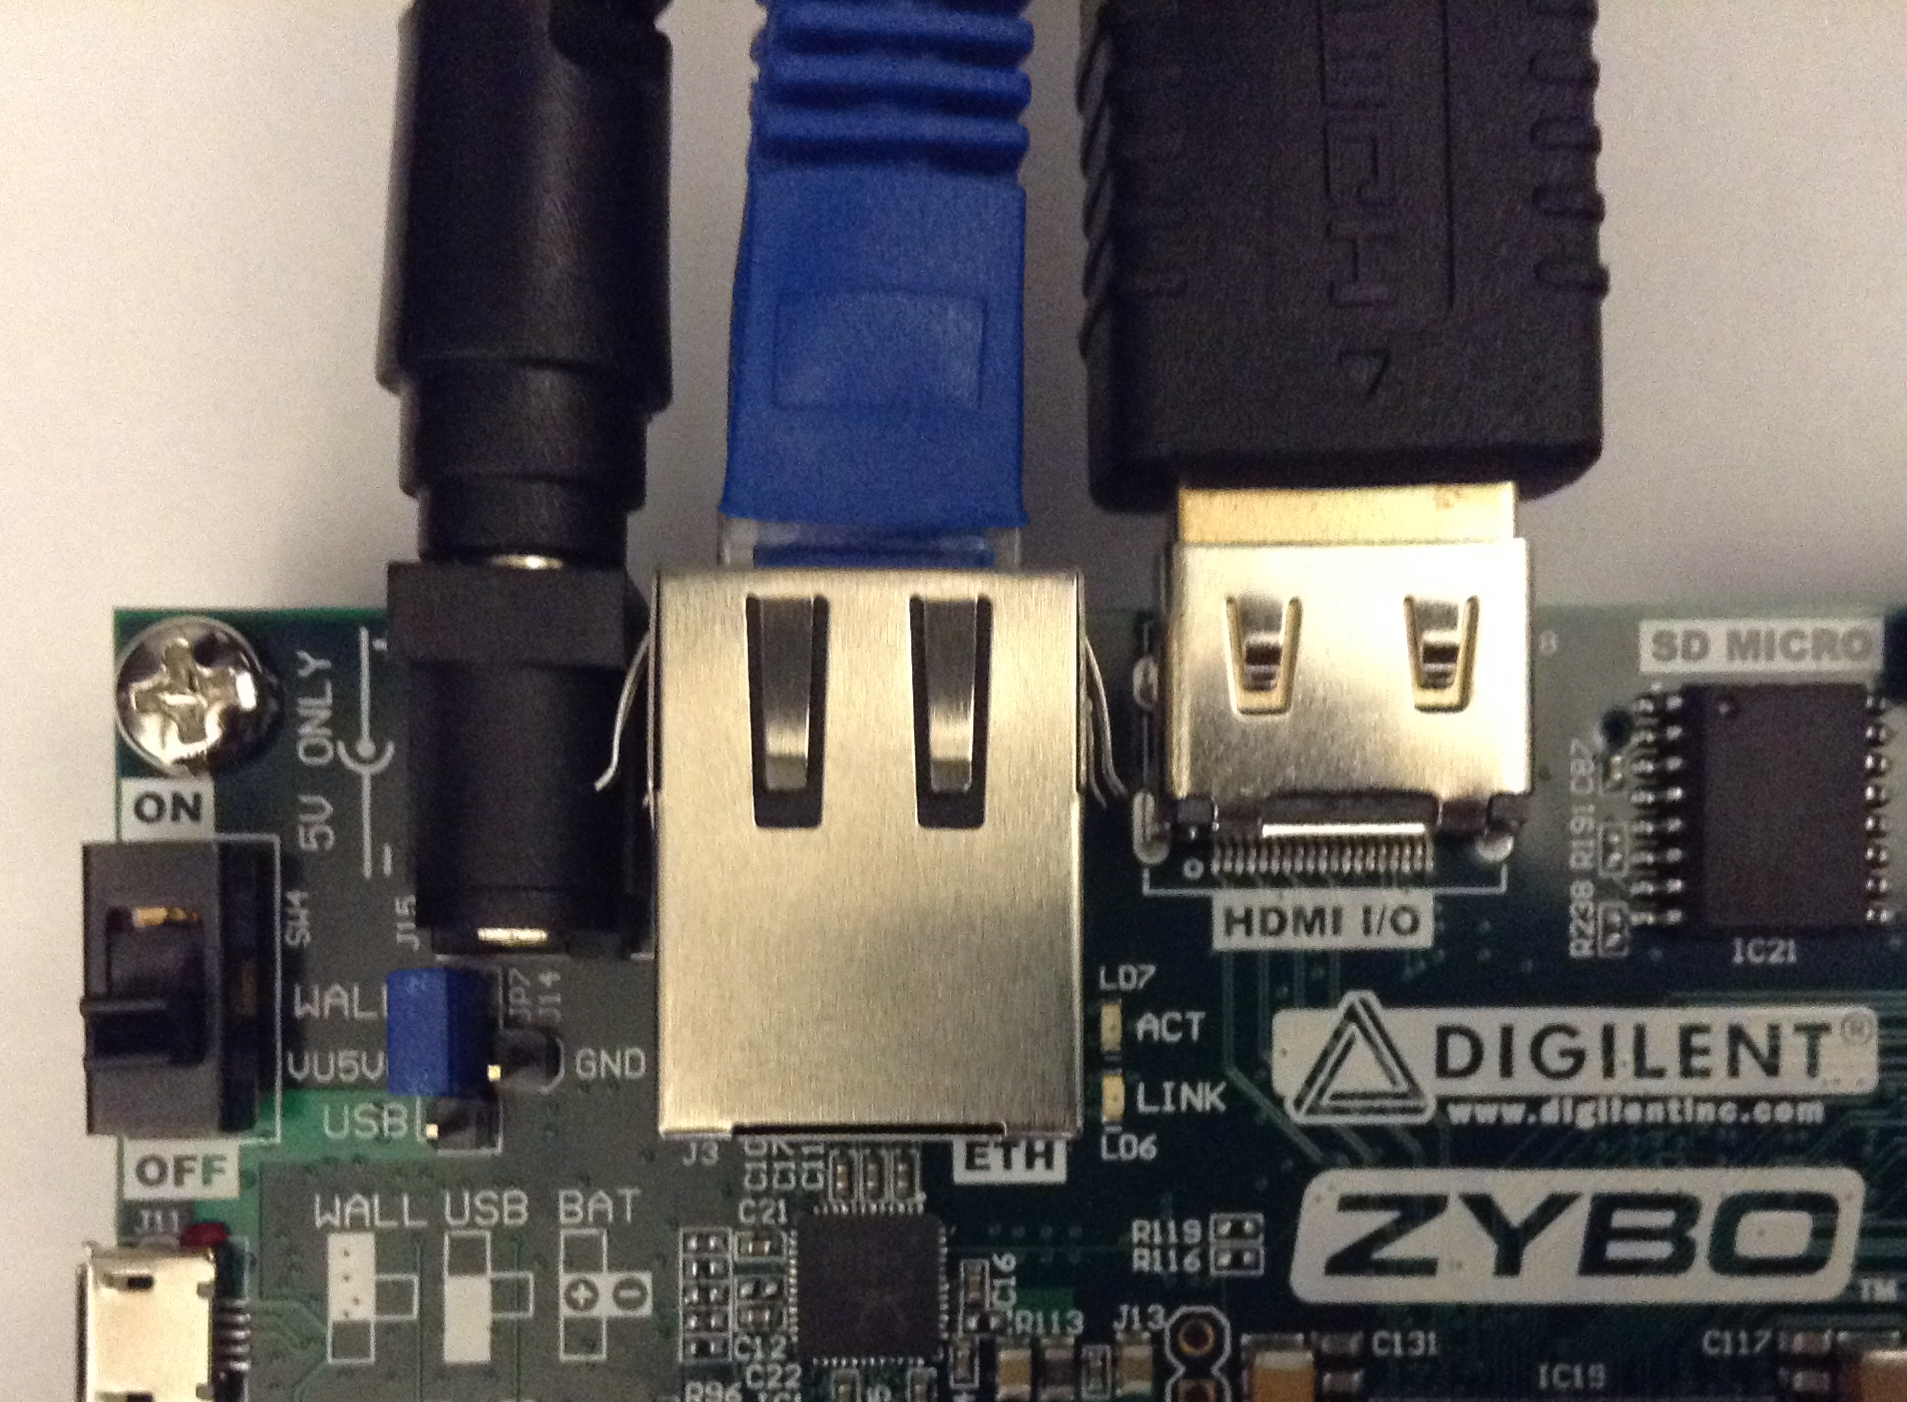
Plugging in HDMI and Ethernet cables
Inserting the MicroSD card into the ZYBO
The MicroSD slot has a label on the top side, and the MicroSD slot is on the reverse side of the ZYBO. In order for the ZYBO to read the MicroSD card, you must change the Jumper Block to the SD jumpers.
At this point, the following should be plugged in:
- USB Splitter
- Keyboard, Mouse, and Wifi Adapter plugged into USB Splitter
- Power Adapter plugged into a wall socket
- Ethernet Cable plugged into an active Ethernet port
- HDMI Cable attached to a monitor
- MicroSD Card
Step 4: Setting up the ZYBO Software
Getting Linux Firmware
Booting up the ZYBO
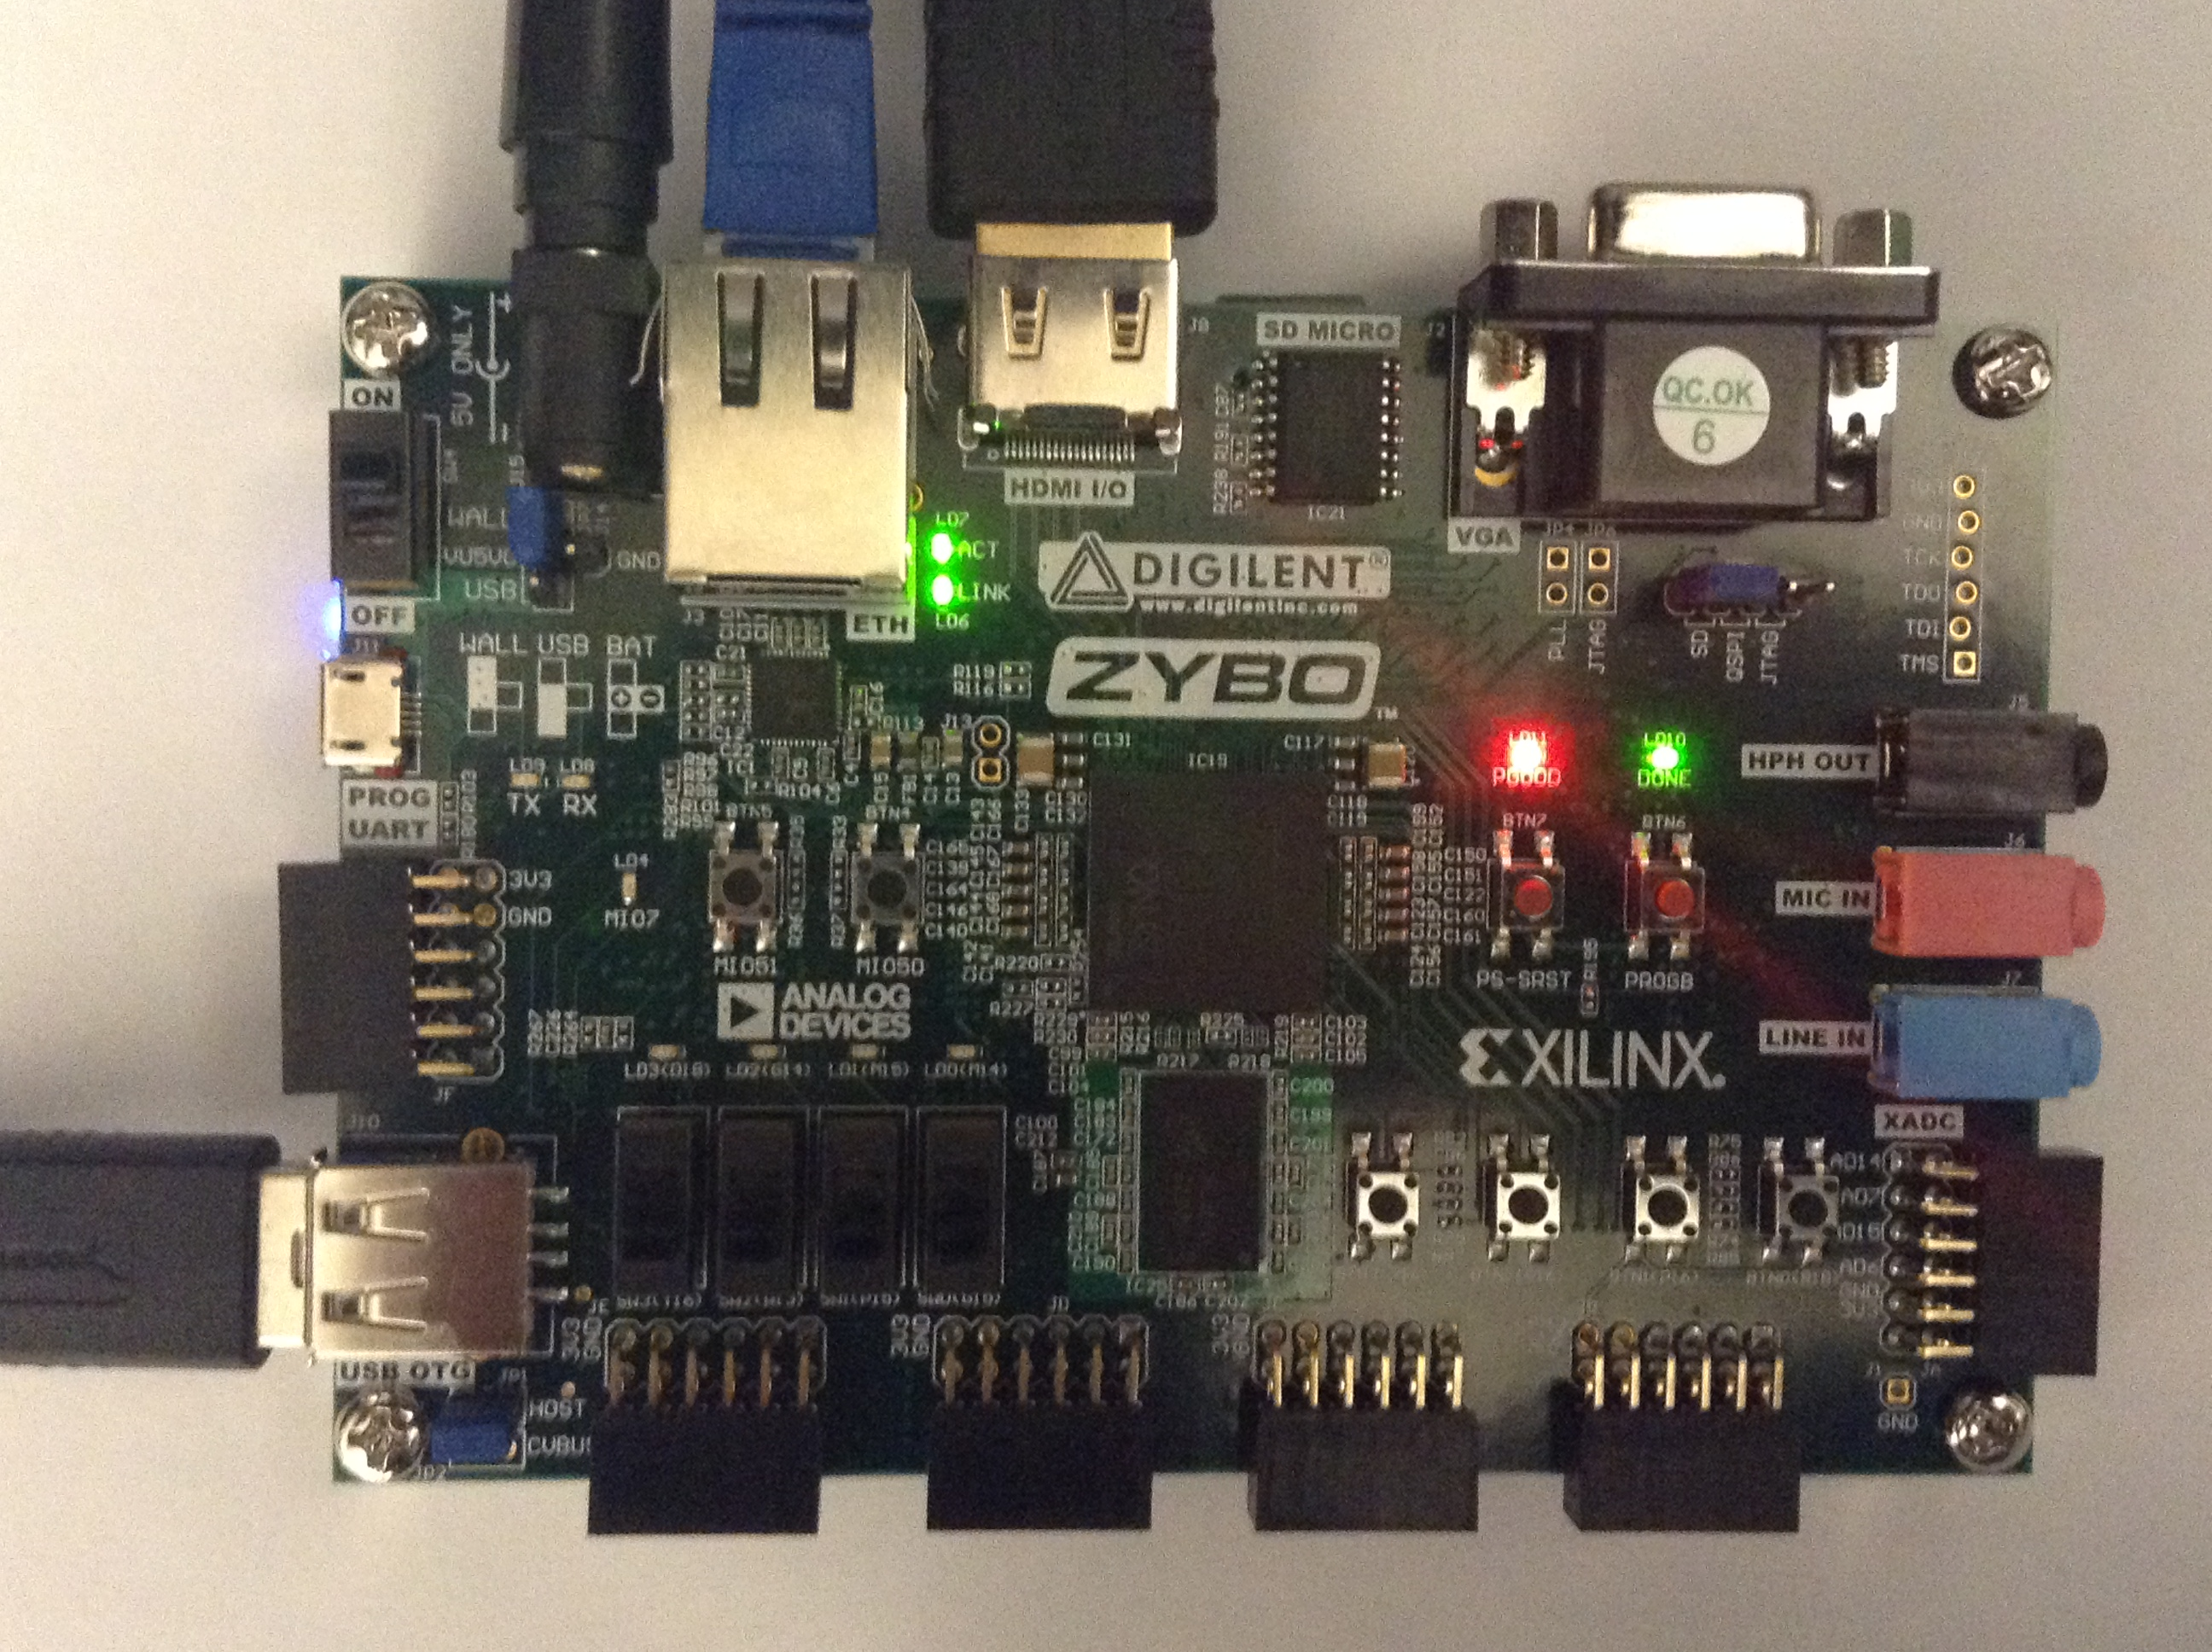
Turn the ZYBO on using the ON/OFF switch
If everything is working correctly, your ZYBO should look like the above picture.
Getting updates installed
Using your ZYBO keyboard enter the command CTRL+ALT+t to open the terminal.
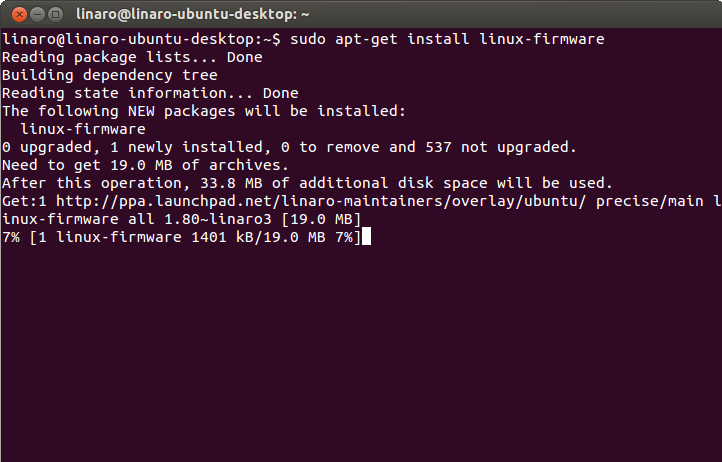
Enter the command sudo apt-get install linux-firmware
This command will install firmware that allows the Wifi to work.
After this has installed press the Reset button on the ZYBO. It will be below the red LED and above the Xilinx logo.
Setting up the Wifi
*Note you may have to unplug then plug Wifi Adapter back into USB Splitter each time ZYBO is shut down.
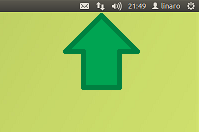
Click on the two arrows in the upper-right hand corner
When a drop menu of the wifi option becomes available (this may take a minute or two), select your wifi and enter you credentials to gain wifi access.
Installing motion
Reopen the terminal using CTRL+ALT+t. Enter the command sudo apt-get update
After that has finished, enter the command sudo apt-get install linux-firmware motion.
Enter Y on the keyboard when the prompt pops up. This is going to give us webcam access.
Configuring the ZYBO
Opening up the Home Folder and ZYBO_BOOT folder
Find the Folders button on the left-hand side of the desktop, right click and open Home.
After home is opened, find the SD card, right-click and open ZYBO_BOOT.
Moving files into home
Now that the Home and ZYBO_BOOT folders are open, you can move files from ZYBO_BOOT to Home. You can copy and paste, or cut and paste.
Do not modify BOOT.bin, devicetree.dtb, or uImage in any way.
Copy server.cpp to Documents
Open a terminal using CTRL+ALT+t.
Enter the command cp files/server.cpp Documents/server.cpp.
This will create a copy of server.cpp and place it in the Documents folder.
Copy usbreset.c into Documents
In the terminal, enter the command cp files/usbreset.c Documents/usbreset.
This will create a copy of usbreset.c and place it in the Documents folder.
Move into the Documents folder
Building server.cpp
Now that we have server.cpp and usbreset.c in the Documents folder, we want to compile their code.
In the terminal, enter the command g++ server.cpp -o server
Building usbreset.c
Replacing the motion.conf file
In the terminal, enter the command cd. This takes us back to our base directory.
Now enter the command sudo rsync -a files/motion.conf /etc/motion/motion.conf in the terminal.
Adding server_script
In the terminal, run the command sudo rsync -a files/server_script /etc/init.d/server_script.
Changing server_script permissions
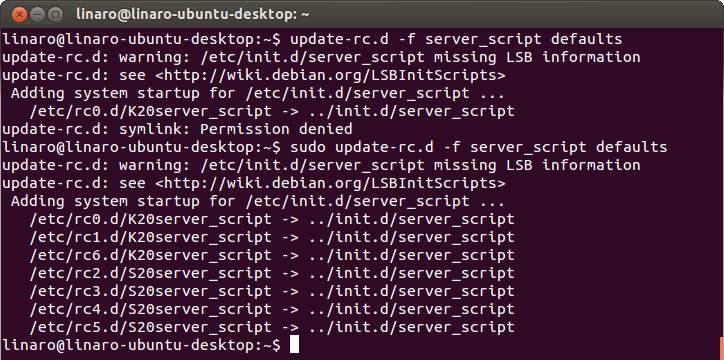
Update startup scripts
Reset your ZYBO
At this point, plug in the webcam into the USB Splitter.
Now hit the reset button on the ZYBO. This will allow all the changes we made on the ZYBO to take place.
—
Finding your IP Address
Be sure to check that you are connected to the internet via Wifi.
Enter the command ifconfig in the terminal, this will help us find the inet address.
Record the inet address.
Viewing your video feed
Because we installed motion and updated everything, you can now watch a live feed of what the webcam video. Enter the inet address and add :8081 at the end.
As long as the computer is connected to the same network, you can view the video feed by using the IP address and a Firefox browser (Chrome is currently not functional).
This concludes most of the software portion of the ZYBOt.
Step 5: Building the ZYBOt
Building the Base
Assemble the Platform (Skip this step if you 3D printed the platform)
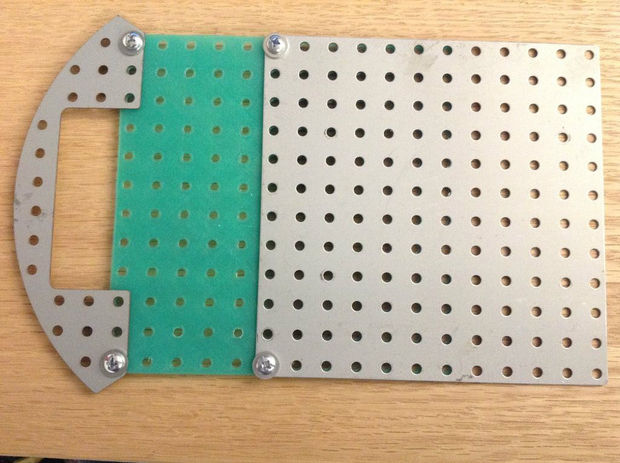
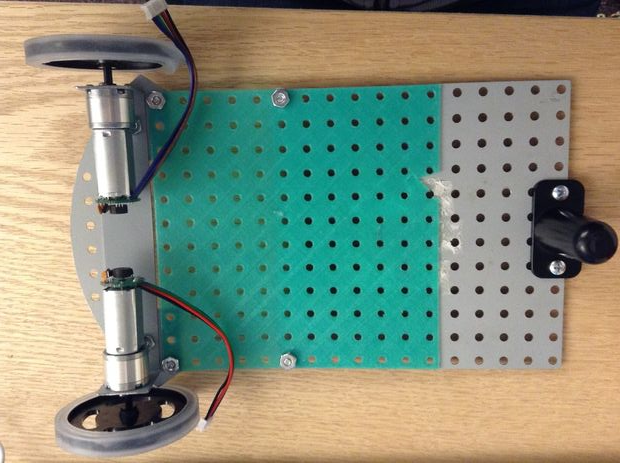
Using the wider screws, screw the two Base plates together on the 6th hole in on the bottom base plate. Then using two more of the wider screws attach the Rounded Plate Expansion Kit to the first hole on the base plate.
Attach the Motor Mount
The motor mount has to be placed fairly far forward in order to keep the ZYBOt balanced.
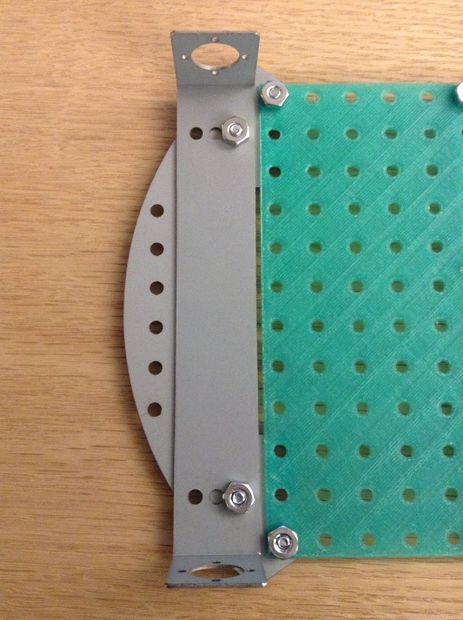
3d Printed plate: Attach the motor mount in alignment with the third hole on rounded bracket.
Metal Base plates: Align the motor mount so the edge is touching the edge of the Base plate. Screw these together with the wider screws. Place the screw in the farthest back hole of the motor mount and the hole on the rounded bracket directly in front of where the base plate is attached.
Mount the Motors
Screw the motors on to the motor mount using the tiny screws that came with the motors. Make sure the wires coming out of the motor face the base plate.
Attach the Wheels and Drag Button
Using the same sized screws as before, attach the drag button to the farthest back set of holes as possible.
Attach the wheels with the D-hub to the motors, and put the sticky tires on.
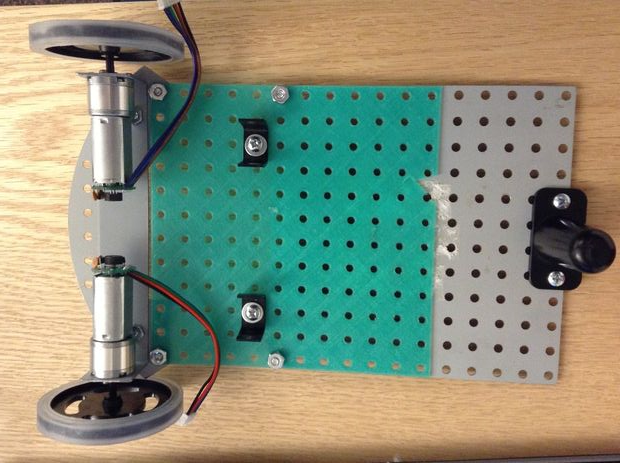
Attach the Pmod Clips for the H-Bridges
Using the included screws and nuts, attach one of the Pmod clips to the 5th hole down and second hole in on the Base Plate, and the second in the same place on the opposite side.
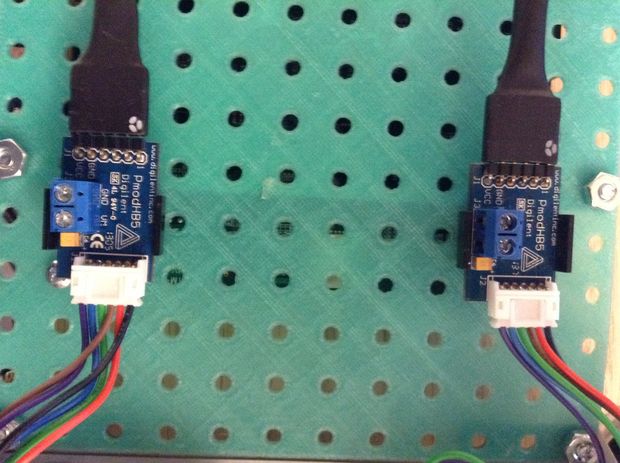
Attach the H-Bridges
Getting the ZYBO ready
Attach the Zybo
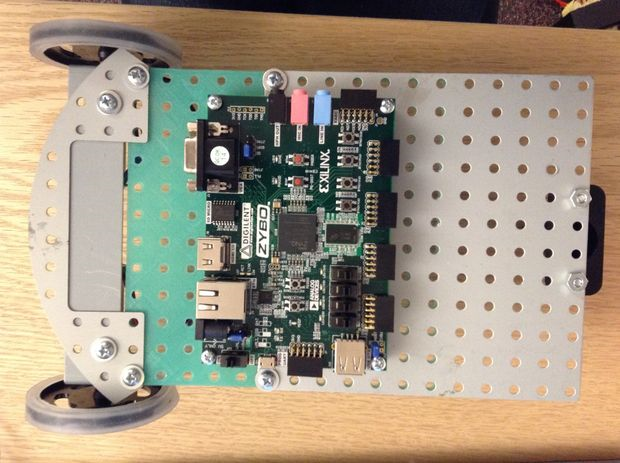
Flip the platform over so the button and wheels are on the bottom.
Attach the ZYBO using four extra screws from the hardware kits and the standoffs that come on the ZYBO. Attach it on the fourth row of the base plate.
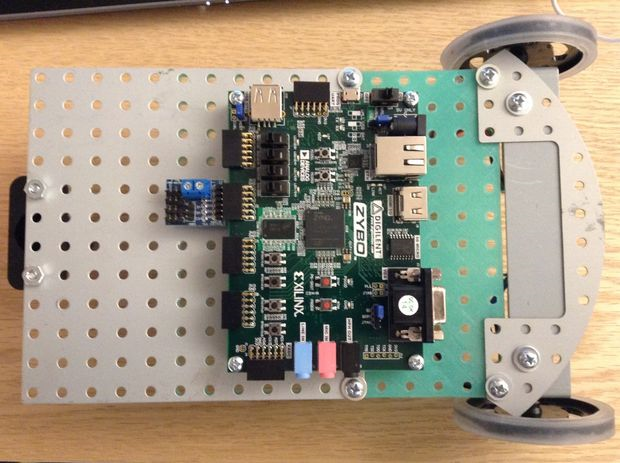
Attach the PmodCON3
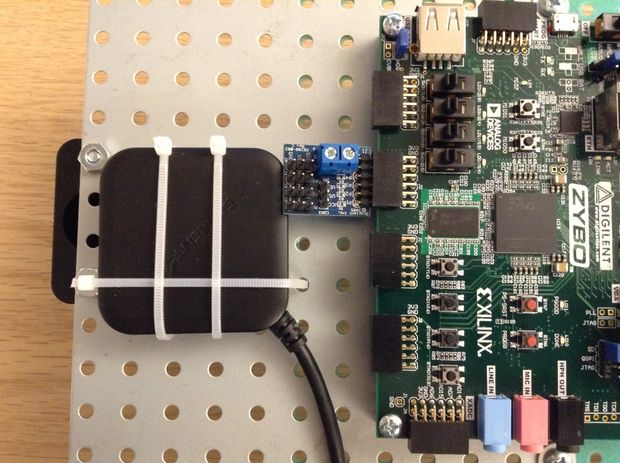
Attach the USB Hub
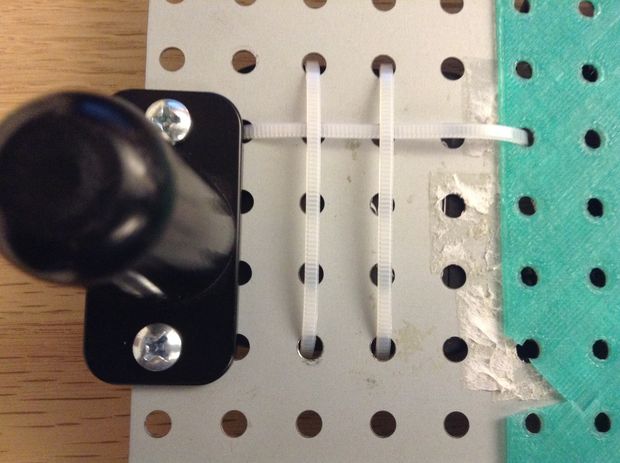
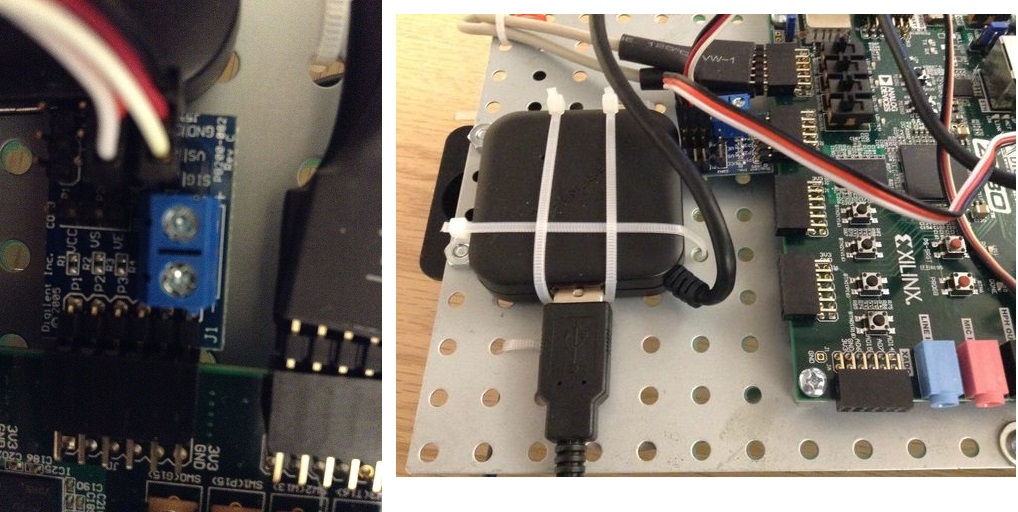
The next thing we need to do is attach the USB hub. We need to place it right in front of the screws attaching the drag button. The Zybot gets jostled around quite a bit, so you'll need to attach it very securely. I use 3 zip-ties. Plug the USB hub into the USB port on the ZYBO.
Tape the Pmod Cables Together
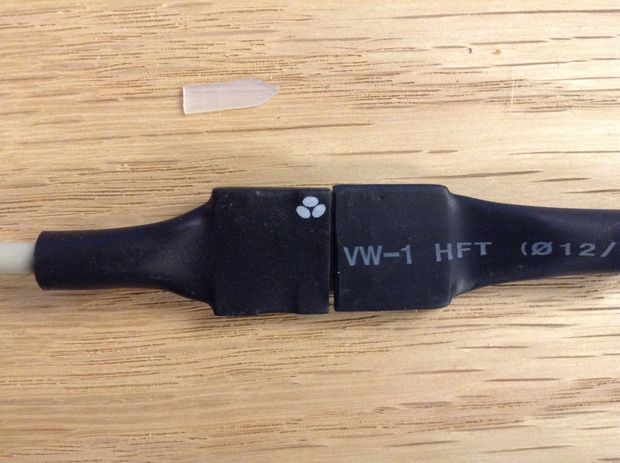
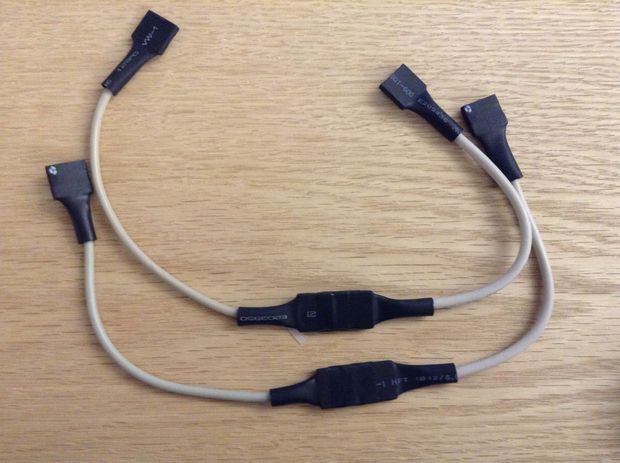
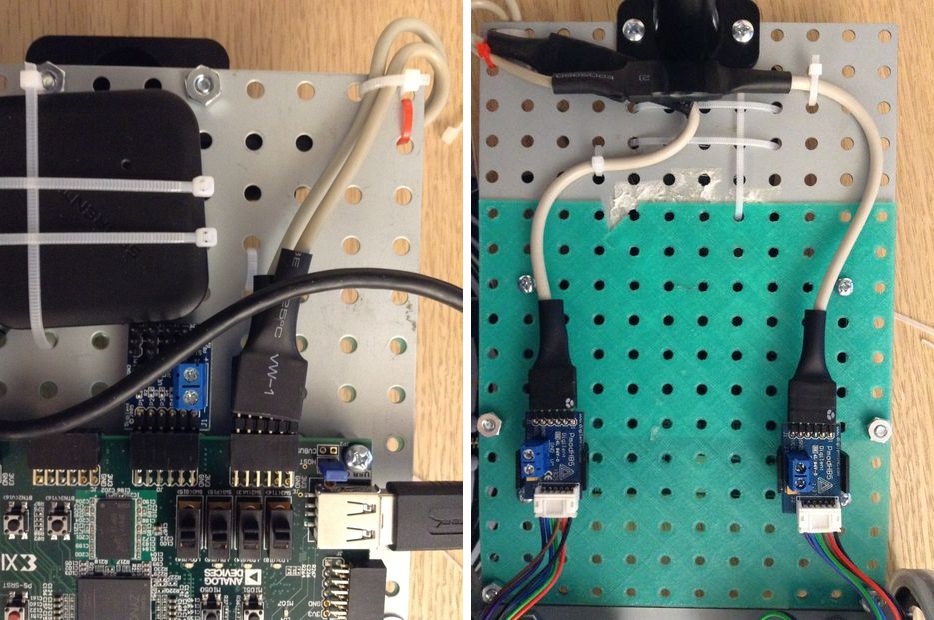
Using the electrical tape, tape the Pmod cables together. Stick a six pin header in each cable and connect them together so they are electrically connected. Pay attention to the flowers on the cable. The flower indicates which pin connects to which on either side of the Pmod cable. To make sure there is no confusion make sure the flowers are together.
In the first image although the flower on the second cable is on the bottom side it is lined up with the flower on the first cable on the top side.
Connect the H-bridges to the Zybo
Use the cables you just created to connect the ZYBO to the H-bridges.
Plug each cable into the H-bridges, insuring that the flower is on pin one of each H-bridge.
Plug the right H-bridge into the top of port JE, and the bottom H-bridge into the bottom of port JE. Again make sure the flower of each cable is attached to pin 1. Use the 6 pin, pin headers to connect the cables to the ZYBO port.
Tighten the loose cables with Zipties
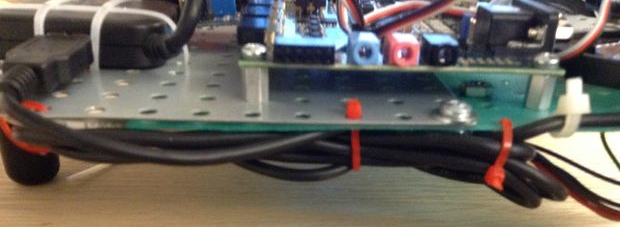
At this point you probably notices that the Pmod cables are dangerously loose. We can fix that with a few zip-ties. Zip-tie the cables down keeping the bulk to the cable as far back on the Zybot as possible.
Setting up the Webcam
Connect the Two Servo Brackets
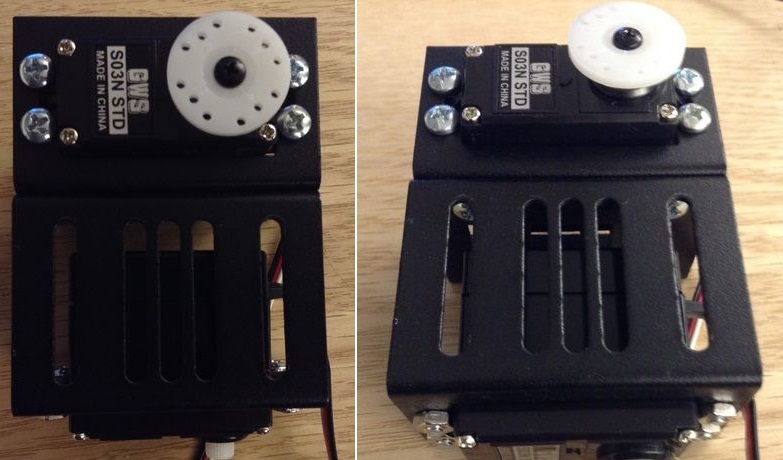
Connect the two servo brackets so that the short side of one is attached to the back on the long side of the second. Be sure to use the screw from the servo bracket kit to connect everything.
Connect the Servos to the Servo Bracket
Attach the servos to the brackets using more of the screws from the servo bracket kit. The top servo should have the circular connector screwed on, and the bottom servo should have no servo connector screwed on.
Connect the Single Motor Mount
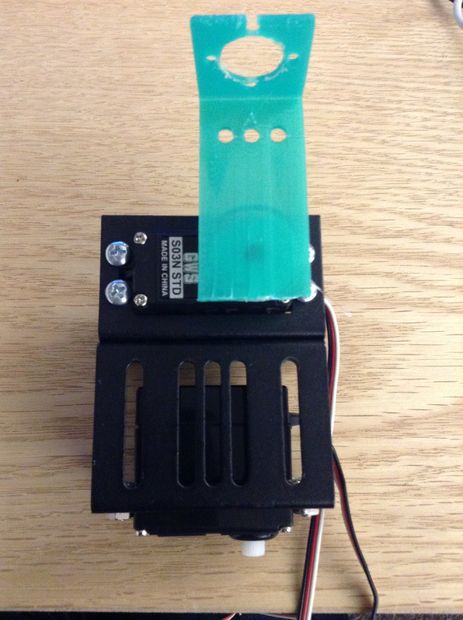
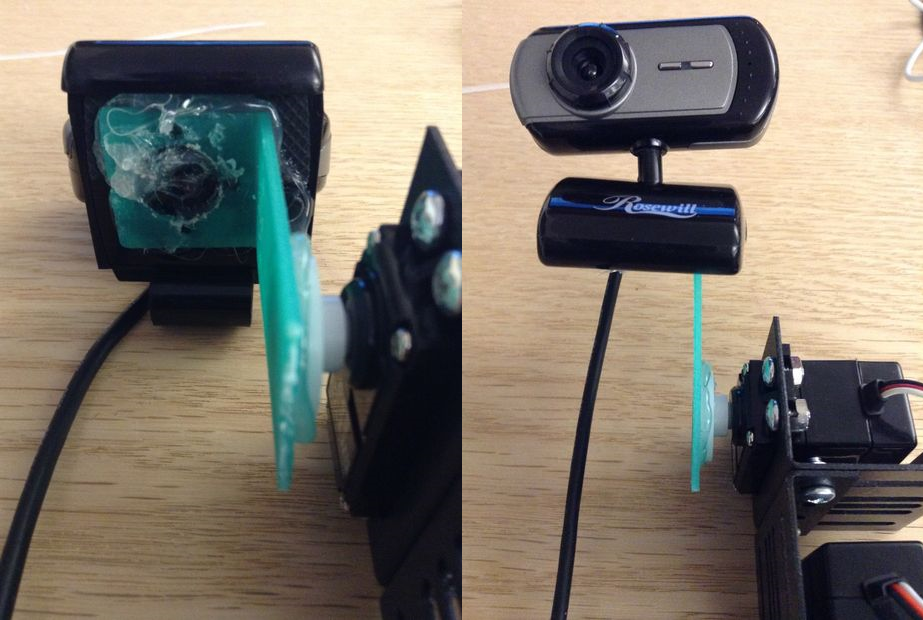
Connect the single motor mount to the circular servo connector, so that there is an arm and a place for the camera to sit on. If you used the 3d printed part you can glue the arm on, otherwise you will have to screw together the two single motor mounts and screw them on to the servo.
Attach the Camera
Create a Base for the Servos
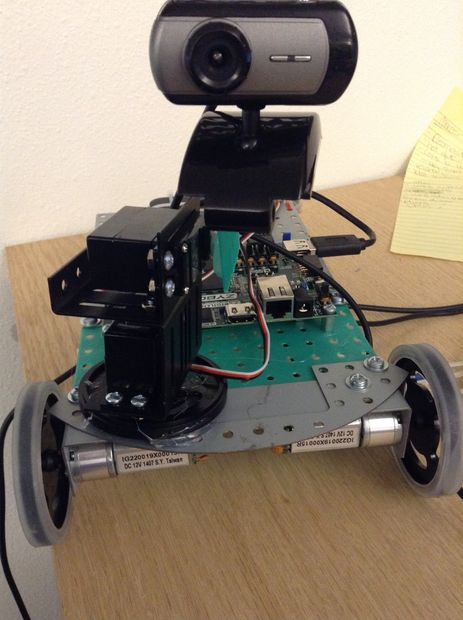
Using the 3/4 inch screws. Attach one of the spined-hub wheels to the far right front of the Zybot. Then connect the servo to the wheel.
Plug the servos into the PmodCON3, paying attention to power and ground, and connect the camera to the USB hub.
Consolidate the cords
Zip-tie the camera cable as desired, making sure to leave enough slack for the camera to maintain its full range of motion.
Connecting the Power
Connect the Battery
Cut two pieces of Velcro about 4 inches long.
Separate the Velcro and then attach it back together overlapping only as wide as the battery.
Close the Velcro so it forms loops and glue those loops in the middle of the Zybot underside.
Connect the Voltage Regulator
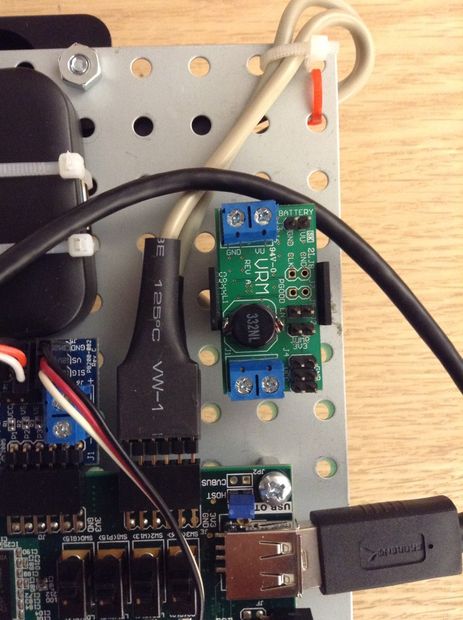
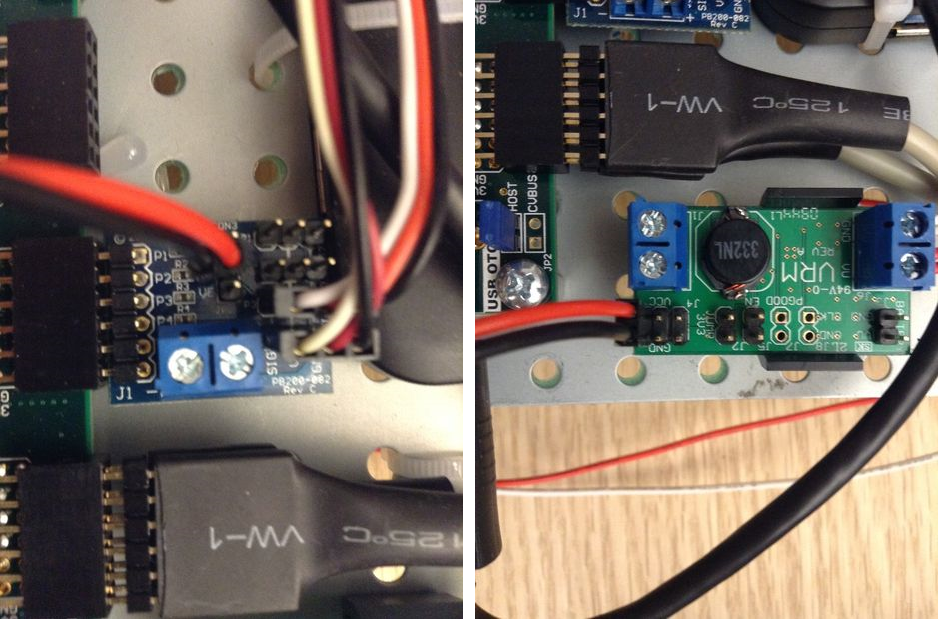
Attach the voltage regulator close the ZYBO power pins and the PmodCON3, the size of the voltage regulator may vary between models.
Power the Motors
Make sure the battery is not plugged into anything at this point.
In order for the motors to run, they require 12V. Connect the 12V side of the Voltage regulator to the motors.
First get two sets of red and black wire long enough to go from the H-bridges to the Voltage regulator. Mine ended up being about 11 inches long. Strip 1/4 inch of insulation from both ends of wires.
Then connect them to the screw terminals. Be sure to connect Red to Vin and Black/White to Ground.
Note: Be very careful that you pay attention to which side is power and which is ground!
Power the Servo
Take one of the two pin MTE power cables, and plug the power side onto the VS pin of the PmodCON3 and plug the other end into the 5V side of the voltage regulator. The servos can only take 5V.
Again, make sure that the power and ground are connected to the respective pins.
It may seem weird that we are only connecting the power side of the PmodCON3. The PmodCON3 will already have a common ground with the ZYBO since it is plugged into the ZYBO so it doesn't need a ground pin. However, this means that you must have all of the power connections done before you plug in the battery, otherwise the servos will float.
Power the ZYBO
Take the second MTE cable and plug that into the 5V side of the voltage regulator. The other side of this will be connected to the ZYBO board. Remove the blue jumper from JP7, which is by the power switch. Plug the MTE cable into the GND and VV5V0 pins paying close attention again to connecting power to power and ground to ground.
Plug in your power source
This step will vary slightly depending the on voltage regulator being used.
Before plugging in the power source, be sure to test everything to ensure that all the wires have been correctly attached.
After everything has been checked, plug in your power source.
Controlling your ZYBOt
Parts
In order to control your ZYBOt, you will need the following parts:
- A Windows Computer
- Connection to the internet
- A wired X-box controller
Download Visual Studio
The project that uses the Xbox controller uses Visual Studio Microsoft offers a version of Visual studio that you can download for free.
Uninstall Microsoft Redistributable 2010
Unfortunately, there is a conflict between the next thing we need to compile the controller and the 2010 version of Microsoft Redistributable.
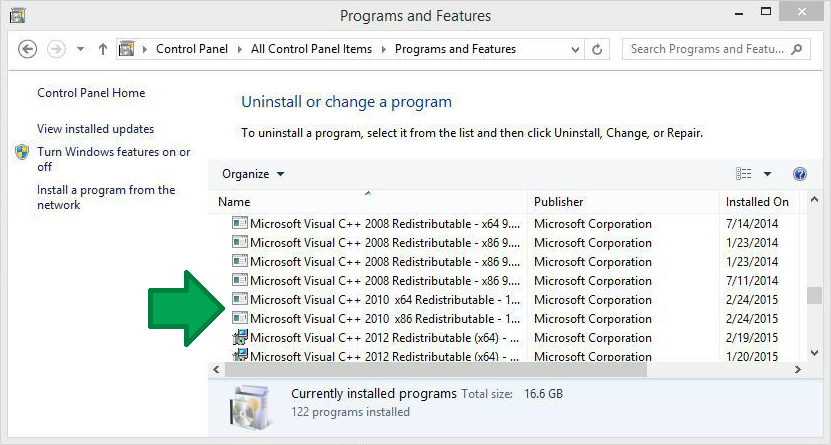
Go to your control panel → Programs and Features
Uninstall all versions of the Microsoft Visual C++ 2010 Redistributable.
Download Direct X SDK
In order to program the X-box controller you need a special tool called Direct X Software Development Kit. Microsoft also has a free download of Direct X.
Download and install Direct X SDK.
Re-install Microsoft Redistributable
Now re-install the Microsoft Redistributable package that you previously un-installed. Download both the x86 and x64 versions for a 64 bit machine.
Download the Visual Studio Project
Download this folder. After the file has downloaded, unzip it to a desired location.
Open the project
Open the project by going to the unzipped folder and double-clicking on the Microsoft Visual Studio Solution.
Run the Project
Make sure the server is running and the WiFi is connected on the Zybo. You can tell the server is up when LD0 is lit. You can tell the WiFi is connected when the blue light on the WiFi adapter is flashing.
Once you run the program the command prompt will appear. Press y and enter to connect to the Xbox controller. The command prompt will tell you if the controller is connected.
Drive Your Zybot Around
You've now completed all the steps to drive around your Zybot. When you want to exit the Xbox controller program just hit the back button on the Xbox controller.
The controller uses one joystick to control the servos and one joystick to control the motors. You can use the triggers on forward and reverse to go into turbo mode.

