This is an old revision of the document!
How To Store Your SDK Project in SPI Flash
Overview
This guide will show you how to easily store your Microblaze/SDK project in the SPI Flash on your 7 series device. Storing a program in Flash allows you to preserve your project through power cycles.
Tutorial
Before you start; this guide assumes that you already have a Microblaze system built complete with Quad SPI, External Memory, and Uart cores, and that you have the appropriate QSpi mode jumper setting. This tutorial takes place in SDK.
0. Compress Bitstreams (Optional)
In certain applications (often when using the Cmod A7 with Microblaze) you might find that you do not have the necessary space in flash in order to store both your program and bitstream configuration. If this is the case it would be worth a try to compress your bitstream in order to get it to fit. Note that using a compressed bitstream in flash will not only take up less space but will also improve initial FPGA programming speeds. These steps take place in Vivado before the bitstream gets generated.
0.1) With your design ready to be generated into a bitstream selectfrom the Flow Navigator.
0.2) Once the implementation has completed either open the implemented design from the pop up window with radio buttons or selectfrom the Flow Navigator. The resulting window should look similar to the following:

0.3) With the Implemented Design still on screen selectand the bitstream settings should pop up.
0.4) Inside of the Bitstream settings check the -bin_file box.
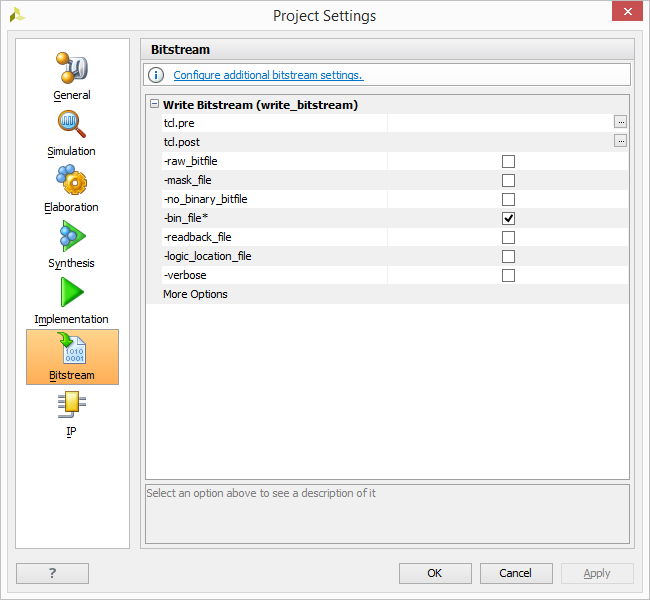
0.5) Next click on Configure additional bitstream settings highlighted in blue at the top of the window. On the following window change the property Enable Bitstream Compresssion to TRUE then select OK until both windows are closed.

0.6) Now Vivado has been configured to output a compressed bitstream which will transfer to your SDK project. Selectand a window might pop up asking you to save your XDC. If so, give the XDC a name and save it. Your bitstream should start generating afterwards.
1. Create a SPI Bootloader Application
1.1) To create our bootloader, go to File > New > Application Project.
Name the bootloader then hit Next.
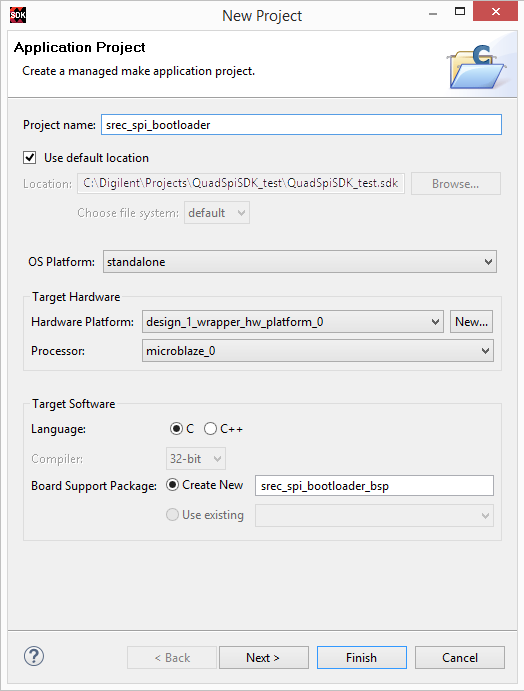
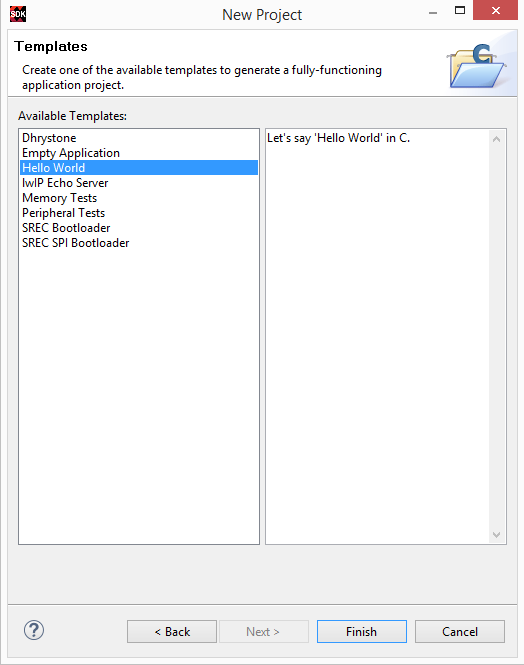
1.2) Select SREC SPI Bootloader and select Finish.

1.3) In your newly created bootloader application, open blconfig.h located in src's and change FLASH_IMAGE_BASEADDR to suit your needs.
It is important to note that this value is the offset that the image will have in Flash.
NOTE: If you are using the Cmod-A7 try the offset: 0x00300000.
NOTE: If you are using the Nexys 4 DDR try the offset: 0x003D0900.
NOTE: If you are using the Arty A7 35T, Nexys Video or the Genesys 2 try the offset: 0x00C00000.

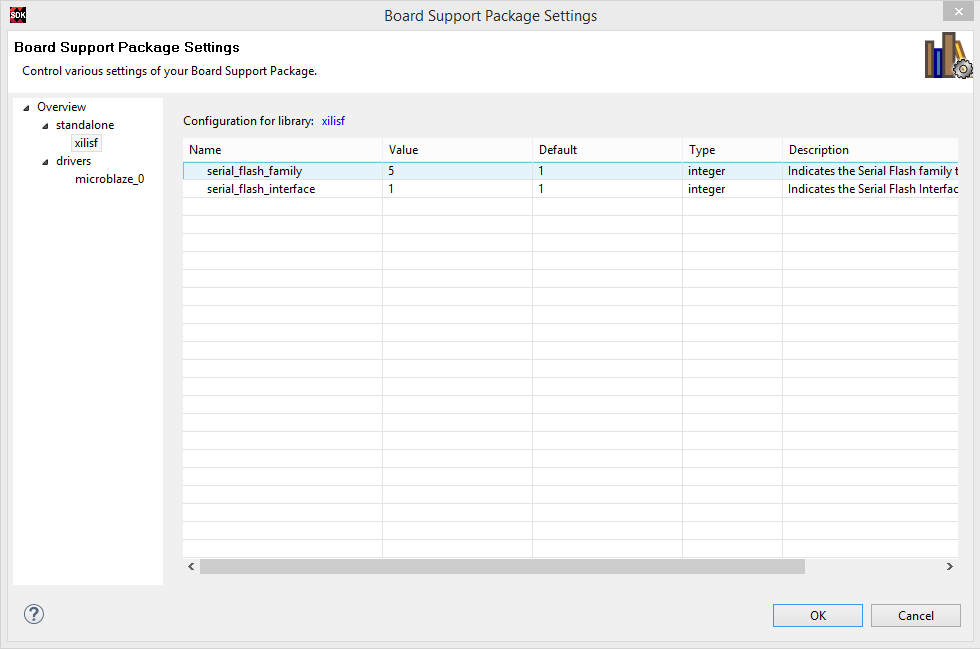
1.4) Next we need to update the BSP to use the updated version of xilisf. To do this, right click on the BSP and select Board Support Package settings and make sure that xilisf is checked and that your version is >= 5.2.

1.5) The memory device info needs to be passed to the xilifs library (Overview > standalone > xilifs).
- serial_flash_family = 5(Spansion/Micron)
- serial_flash_interface = 1(AXI SPI)
1.6) In order to increase the speed even further we can shorten and silence our bootloader. To do this navigate to srec_spi_bootloader > src > bootloader.c, scroll down to where the preprocessor directive VERBOSE is declared and comment it out.
Make sure to re-build the application after making these changes.

2. Create A User Application
This application will be the one that gets stored into Flash. For this tutorial we will be creating a simple Hello World project but the process applies to any project that you would want stored in flash.
2.1) Create a Hello World application. File > New > Application Project and name your app. Then select Next.

2.2) Select the Hello World application template.
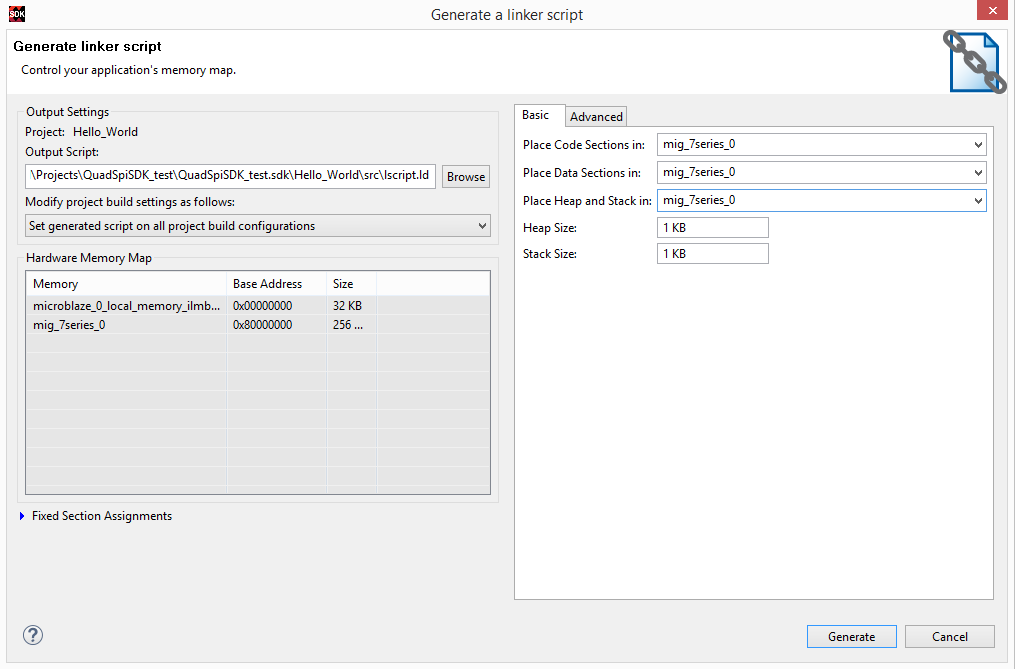
2.3) Next we need to make sure to store our program in DDR. In order to do this, right click on the Hello World application, and select Generate Linker Script.
Place all sections into DDR:
3. Generate Bitstream with BRAM initialized with bootloader
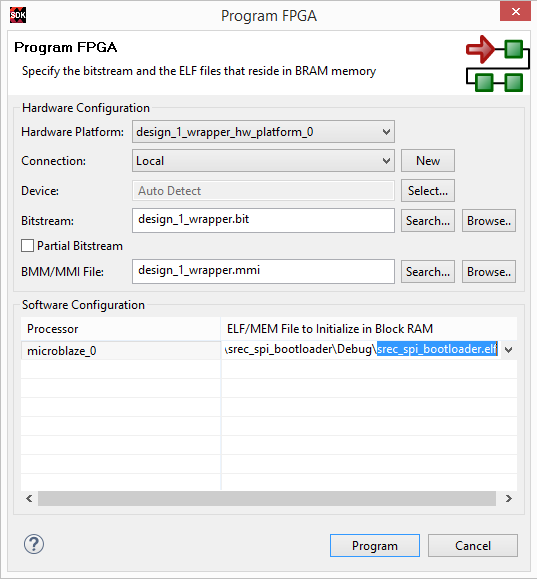
3.1) Open Program FPGA (Xilinx Tools > Program FPGA) and select the bootloader ELF (created in 1.1) under ELF/MEM File to Initialize in block RAM, and select Program to continue.
This will run update_mem, and will output a download.bit file.
4. Program Flash
In this step we will use the SDK Program Flash Memory utility to program our Hello World application to Flash.
4.1) Go to Xilinx Tools > Program Flash. Change the Offset to the value used in blconfig.h in step 1.3.
Select your Flash Type and hit Program.
tip box
For Vivado 2017.1 to the current version of vivado the Arty flash type is mt25ql128-spi-x1_x2_x4

4.2) The Program Flash Memory utility will be used again to store the bitstream initialized with the bootloader in BRAM.
The Image File is the download.bit that was generated in 3.1, and should be located inside of your hardware platform folder.The Offset is 0x0 since the bitstream will be loading our project into memory. Select Program to continue.

5. Test
The flash has now been programmed with our Hello World, SREC, bitstream, and bootloader. With your board connected to a serial port reset the board. This will configure the FPGA and run our Hello World application!