Using the Script Editor

Introduction
This guide explains the use of WaveForms' Script Editor instrument. This instrument is used to create, run, and debug scripts that can control all of WaveForms' other instruments.
Prerequisites
- A Digilent Test & Measurement Device compatible with WaveForms:
- A Computer with WaveForms Software Installed
Guide
1. Opening the Script Editor
1.1
Plug in the Test & Measurement Device, then start WaveForms and make sure the device is connected.
If no device is connected to the host computer when WaveForms launches, the Device Manager will be launched. Make sure that the device is plugged in and turned on, at which point it will appear in the Device Manager's device list (1). Click on the device in the list to select it, then click on the buffer size (2). Click the Select button (3) to close the Device Manager.
Note: “DEMO” devices are also listed, which allow the user to use WaveForms and create projects without a physical device.
Note: The Device Manager can be opened by clicking on the “Connected Device” button in the bottom right corner of the screen (4.), or by selecting “Device Manager” from the “Settings” menu at the top of the screen.

1.2
Once the Welcome page loads, in the instrument panel at the left side of the window, click on the Script button to open the Script Editor instrument.

1.3
When the Script Editor has opened, it will display the text editor (1), the output panel (2) below the editor, and the control toolbar (3) at the top.

2. Using the Script Editor
This section walks through how to use the Script Editor. Two examples are presented below. Other example scripts are available within the Script Editor.
- Oscilloscope and Waveform Generator
-
2.1 Hardware Setup
To demonstrate the Script Editor, the Oscilloscope and Waveform Generator instruments will be used.
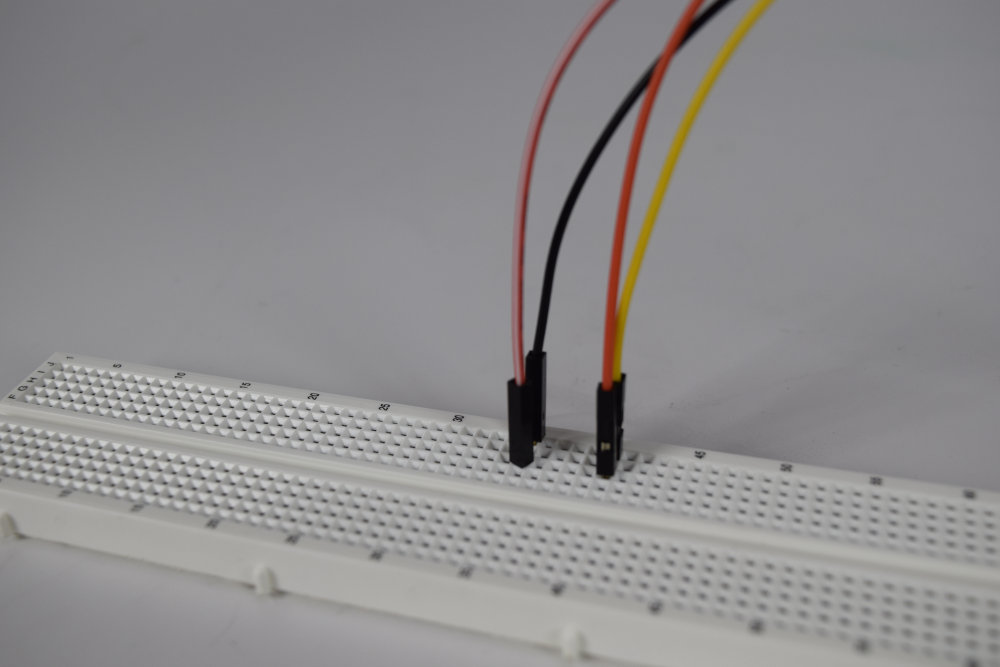
For devices using MTE cables, first, connect the Test & Measurement scope channel 1 pin (orange wire) to the device's Waveform Generator Channel 1 output pin (yellow wire). For devices that use differential input channels, make sure to connect the scope channel 1 negative pin (orange wire with white stripes) to the ground pin associated with Waveform Generator Channel 1 (black wire).
If you instead want to use BNC cables, or your device does not support MTE cables, please see Using the Oscilloscope and/or Using the Waveform Generator for additional information.
2.2 Software Setup
For the Script Editor to make use of the instruments, they must be open in WaveForms. In WaveForms' Welcome tab, open the Oscilloscope instrument, then open the Waveform Generator instrument. Their settings do not need to be changed.

Return to the Script tab to view the Script Editor instrument.
Open the Scope and Wavegen example script, by selecting it from the Example dropdown.

Prior to running the script, what it does and how it works will be briefly discussed:
- The “clear” call empties the Output pane of any statements that have previously been printed.
- The second line checks whether the Oscilloscope and Waveform Generator instruments have been opened, and throws an error if either is missing.
- Several options for the two instruments are then set. Using mostly default options, the Waveform Generator Channel 1 outputs a 1KHz sine wave with a 1V amplitude and an initial DC offset of 0.5V. The Oscilloscope trigger is set to capture repeated trigger events of the input signal rising past a 0V level.
- Next, both instruments are started with a “run” call, which has the same effect as if the Run button in each instrument was pressed.
- The remaining steps are looped 10 times, waiting for one second between each iteration - wait returns True once the number of seconds passed to it have elapsed.
- The “Scope1.wait” statement checks whether the Oscilloscope or Script Editor instruments have been manually stopped since the script began running, and throws an error if either is no longer running.
- Several variables are then used to store some measurements about the data that was captured on Oscilloscope Channel 1. In this case, the “Middle” and “Average” measurements are printed.
- The “Middle” is the average of only the highest and lowest samples captured.
- The “Average” is the average of all of the samples in the dataset.
- Lastly, the Waveform Generator's DC offset voltage is changed, by subtracting half of the Middle voltage.
Summarizing, the Waveform Generator and Oscilloscope instruments are configured, run, and used to slowly tune the DC offset of the Waveform Generator so that the middle of the captured data approaches 0V.
// This script adjusts the Wavegen offset based on Scope measurement.
clear()
if(!('Wavegen1' in this) || !('Scope1' in this)) throw "Please open a Scope and a Wavegen instrument";

Wavegen1.Channel1.Mode.text = "Simple";
Wavegen1.Channel1.Simple.Offset.value = 0.5;
Scope1.Trigger.Trigger.text = "Repeated";
Wavegen1.run();
Scope1.run();
for(var idx = 0; wait(1) && idx < 10; idx++){
//    if(!Scope1.wait()) throw "Stopped";
    var middle = Scope1.Channel1.measure("Middle");
    var average = Scope1.Channel1.measure("Average");
    print(idx+" Middle: "+middle+" V"+" Average: "+average+" V");
    // adjust Wavegen offset
    Wavegen1.Channel1.Simple.Offset.value -= middle/2;
}
More information on the functions and objects available in the Script Editor can be found in the in WaveForms' Help tab's Script page. Additional configuration options for each of the individual instruments not covered by the Script page can be found in the pages dedicated to those instruments.

2.3 Running the Script
Return to the Scripts page by clicking on its tab in the bar at the top of the screen.
Click the Run (
 ) button in the Script Editor tab to start running the example.
Print statements and uncaught errors are shown in the Output panel.

2.4 Debugging
If in the process of writing a script, the script needs to be stepped through to find errors, the Script Editor's debugger can be used.
Debugging is done inside WaveForms itself, allowing the user to step through the execution of the script. The debugger is accessed by clicking the Debug (
 ) button, which will open a new window with the Qt debugger tool.

- Protocol Analyzer
-
2.1 Hardware Setup
To demonstrate the Script Editor, the Protocol Analyzer instrument will be used to transmit and receive UART signals.
Connect the Test & Measurement Device's digital I/O channel 0 pin (DIO0) to its digital I/O channel 1 pin (DIO1).
2.2 Software Setup
For the Script Editor to make use of the Protocol Analyzer instrument, it must be open in WaveForms. In WaveForms' Welcome tab, open the Protocol instrument and open the UART Send and Receive page. Its settings do not need to be changed.

Open the Protocol UART example script, by selecting it from the Example dropdown.

Prior to running the script, what it does and how it works will be briefly discussed:
The Protocol Analyzer instrument is configured in UART mode, and is used to send and receive data. First, the string “Hello” is sent, received, and printed to the Output pane. This is repeated with the string “Hello”, with an tab character added to the end, and for an array of data specified as integers.
// Script using Protocol UART.
if(!('Protocol' in this)) throw "Please open the Protocol tool";

Protocol.Mode.text = "UART" // make sure UART tab is selected
Protocol.UART.Receiver() // reset receiver

Protocol.UART.Send("Hello") // send text with ending
var rx = Protocol.UART.Receive() // receive text
print(rx)

Protocol.UART.Send("Hello	", false) // send text custom ending
var rx = Protocol.UART.Receive() // receive text
print(escape(rx))

Protocol.UART.SendArray([1,2,3,4,5,0], false) // send array custom ending
var rx = Protocol.UART.ReceiveArray() // receive array
print(rx)
More information on the functions and objects available in the Script Editor can be found in the in WaveForms' Help tab's Script page. Additional configuration options for each of the individual instruments not covered by the Script page can be found in the pages dedicated to those instruments.
2.3 Running the Script
Click the Run (
) button to start running the example.
Print statements and uncaught errors are shown in the Output panel.

2.4 Debugging
If in the process of writing a script, the script needs to be stepped through to find errors, the Script Editor's debugger can be used.
Debugging is done inside WaveForms itself, allowing the user to step through the execution of the script. The debugger is accessed by clicking the Debug (
) button, which will open a new window with the Qt debugger tool.

3. Script Editor User Interface Overview
This section walks through the different controls and features present in the Script Editor.
3.1 The Control Toolbar
The control toolbar contains menus and control interfaces used to configure the Script Editor, listed below:
- Debug: Opens a QT Script Debugger window.
- Run: Executes the script.
- Stop: Stops debugging or execution of the script. For Stop to work, the code needs to use the instrument.wait() function.
- Abort: Forces the execution to halt immediately.
- Zoom In & Zoom Out: Used to increase or reduce the font size of the code editor respectively.
- Clear: Clears the Output Panel
- Example: Contains a set of example scripts that use a variety of different instruments.

3.2 The Menu Bar
File is used to open an existing WaveForms Script Editor project, save the current Script Editor project, or close the Script Editor.

Edit contains buttons for Undo and Redo, as well as options for enabling shortcuts for code completion and finding and replacing.

Control accesses the Debug, Run, Stop and Abort actions.

View has options to enable the Output panel and a plotting window.

The Window menu can be used to access other instruments, the WaveForms home page and the WaveForms Help.

3.3 The Search Toolbar
This toolbar can be used to search for certain parts in the script, and to replace those parts. Settings for wildcard support in the input string can be opened with the  icon.
icon.

3.4 The Script Editor
The Script Editor is an editor where the JavaScript code can be viewed and edited.

3.5 Output Panel
The output panel contains the results of print() statements and error messages.

3.6 WaveForms Help Tab
Accessed via Help in the tab bar, the WaveForms Help Tab contains reference materials for all WaveForms instruments.
Section 4, “Code”, of the Help tab's “Script” page documents the functions and objects that can be used in WaveForms scripts, the scripting API for WaveForms.
Next Steps
For more guides on how to use the Digilent Test and Measurement Device, return to the device's Resource Center, linked from the Test and Measurement page of this wiki.
For more information on WaveForms visit the WaveForms Reference Manual.
For technical support, please visit the Test and Measurement section of the Digilent Forums.