Analog Discovery - Ohm's Law
Project 1: Resistors
In this experiment, we will use Digilent's Analog Discovery and a digital multimeter to explore a fundamental equation used in electric circuit analysis and design: Ohm's Law. Ohm's law describes the relationship between the voltage across a resistor and the resulting current passing through the resistor. The links in the related material section provide more detail regarding these topics.
Ohm's law states that the voltage across a resistor and the current through the resistor are proportional to one another. The constant of proportionality is the resistance. There are three variations of Ohm's Law in equation form:
$$v = i \cdot R$$ $$i = \frac{v}{R}$$ $$R = \frac{v}{i}$$
Related Material:
Prerequisites
- Be able to use the Analog Discovery's voltage instrument and AWG to provide constant (DC) voltages.
- Be able to measure voltage using a voltmeter.
- Be able to measure current using an ammeter.
Inventory
- 1 Digital multimeter
- 1 A resistor with red as the third color band (They will be in the 1kΩ to 9.9kΩ range)
- 2 Analog Discovery pins
1. Understanding the Circuit
A. Circuit Schematic
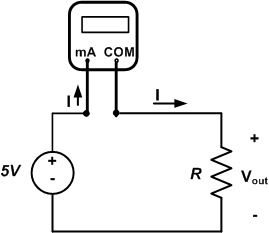
- Use V+ to apply 5V across the resistor.
- Use the DMM in series with the resistor in the circuit to measure the current.
- Use channel 1 (1+ and 1-) to measure the voltage difference (VOUT) across the resistor.
B. Create Circuit
- Connect V+ (red wire) to one removable pin.
- In a different row, connect the other removable pin to the resistor.
- Connect 1+ (orange wire) and 1- (orange and white striped wire) across the resistor, with 1+ on the side closest to V+.
- Connect ground (↓, black wire) to the resistor.
- Note: The removable pins are where the leads of the DMM will be connected.
2. Set up Instruments
A. Open Voltmeter Instrument
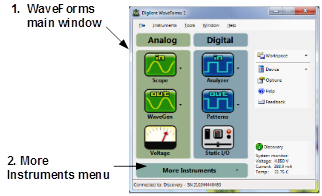
- Open WaveForms™ to view main window.
- Click on the More Instruments dropdown menu to open the Voltmeter instrument.
- Note: The Voltmeter instrument will allow us to measure the voltage difference (VOUT) across the resistor.
B. Open Voltage Instrument
- Return to the WaveForms main window.
- Click on the Voltage icon to open the Power Supplies instrument.
C. Turn on Power
- Channel 1 on the Voltmeter instrument will not show a voltage difference across the resistor since the DMM is not connected to the removable pins yet.
3. Experiment
A. Collect Data
- Set the DMM to measure milliamperes (mA). Connect it to the circuit by pressing the red lead to the removable pin connected to V+. The black lead (COM) should be pressed to the other removable pin.
- Record the current value measured on the DMM as well as the voltage value measured on Channel 1 of the Voltmeter instrument.
B. Analyze Data
- Use the equations provided in the introduction to this project and the values you measured in Part A to estimate the resistance of the resistor you chose for your experiment. Record this resistance value.
C. Compare with Expectations
- Use the color bands on the resistor to determine its nominal resistance. Calculate a percent difference between the value calculated in Part B and the expected value determined from the color bands. Percent difference is calculated as:
$$\% {\rm{ Error = }}\left| {\left. {\frac{{Measured - Expected}}{{Expected}}} \right|} \right. \times 100$$
Is the difference within the range you would expect based on the tolerance color band of the resistor?
Test Your Knowledge
- Use the DMM to measure the resistance of the resistor directly. Record this resistance. Calculate a percent difference between this value and the expected value based on the resistor color codes. Is the difference within the range you would expect based on the tolerance color band of the resistor?
- Use the waveform generator to apply a 3V voltage difference to the resistor. Measure the resistor voltage and current and calculate a resistance, as in Step 3 of this experiment. How does this resistance compare to the value calculated previously?
- (Note: Basic use of the waveform generator is discussed in Project 3 of Module 1. The icon with a straight line corresponds to a constant voltage.)


