Relay Controlled LEDs
Introduction
In this project, we will demonstrate how to use a relay to control a circuit. A relay is an electrically operated switch that is typically used to control high power circuits. Although the relay in the chipKIT™ Starter Kit is designed to handle high power loads, we will be using it to route power to one of two LEDs.
Prerequisites
- Know how to setup a button.
- Understand the basic operation of diodes.
- Understand how to use a transistor as a switch.
- Have a basic understanding of charging and discharging inductors or capacitors.
Inventory
- 1 Relay (SPDT)
- 1 N-FET transistor: ZVN2110A
- 1 Diode
- 1 Button
- 2 LEDs
- 3 220 Ω Resistors (Red, Red, Brown)
How a Relay Works
The most basic relays consist of an electromagnetic coil and two metal plates. When you apply power to the coil, the magnetic force generated connects the two plates to complete the circuit that the plates are attached to. Typically, the plates are attached to a circuit that is much higher voltage or amperage compared to the coil circuit. This means any low power device, such as a chipKIT board, can safely control large voltages or amperage without being in any danger.
Types of Relays
When dealing with relays, there are four common types available. Their names consist of acronyms that describe how they work. To determine what kind of relay you are working with, you need to understand the terminology that the acronym represents. For example, SPST stands or Single Pole Single Throw. The two key terms to understand from the name are “pole” and “throw.”
The term throw originates from similarities between relays and regular switches. Throwing a switch is synonymous to flipping it on or off. Similarly, when you throw a relay, it means that you have changed the position of the connector inside.
The term pole refers to the mechanical connector controlled by a relay's coil. Looking at the relay schematic seen below in Fig. 1, it is easy to see how the connector resembles a pole on a hinge.
Single pole single throw (SPST)
Single Pole Double Throw (SPDT)
This type of relay that is provided in the parts kit. It has one pole that can be thrown to one of two terminals.

Note
In Fig. 2, the pole is connected to terminal C by default. This means when the relay is off, terminals A and C will be connected. Due to this relationship, terminal C is referred to as the normally closed (NC) terminal, while Terminal B is referred to as the normally open (NO) terminal.
Double Pole Single Throws (DPST)
This type of relay has two separate poles. When activated, both poles connect to their respective terminals simultaneously.

Double Pole Double Throw (DPDT)
DPDT relays have two poles just like DPST relays. The poles of this relay can be thrown to one of two terminals just like in SPDT relays.

Building the Circuit
In this project, we will demonstrate how to use a relay to control a simple circuit. The relay we will be using is an SPDT relay. It can handle a maximum switching voltage of 30V DC or 250V AC, at a maximum of 5 amps. Although the relay in the Parts Kit is designed to handle high power loads, we will be using it to route power to one of two LEDs. In order to switch the relay's path, its coil must be powered with a minimum of 10mA at 5V DC or a maximum of up to 37.5 mA at 12V DC. Unfortunately, the chipKIT does not have any 5V or 12V pins it can readily turn on or off. To circumvent this problem, we will use the chipKIT's digital pins to control an N-FET transistor.
If you are unfamiliar with how FET transistors work, follow the red tab on the right. The transistor will act as an electrically controlled power switch connected to the chipKIT's 5V source. FET transistors are commonly used in this way to act as low current switches. Transistors normally cannot pass large amounts of current (the ZVN2110A N-FET for this project is only able to pass 320 mA). This is the main reason why relays are used as electronically controlled switches, as they can pass large currents without trouble.
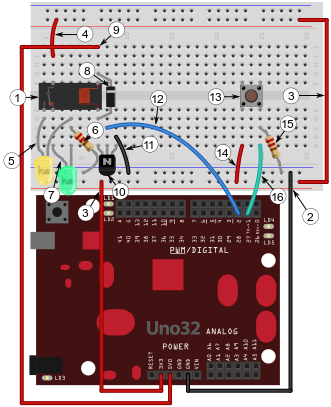
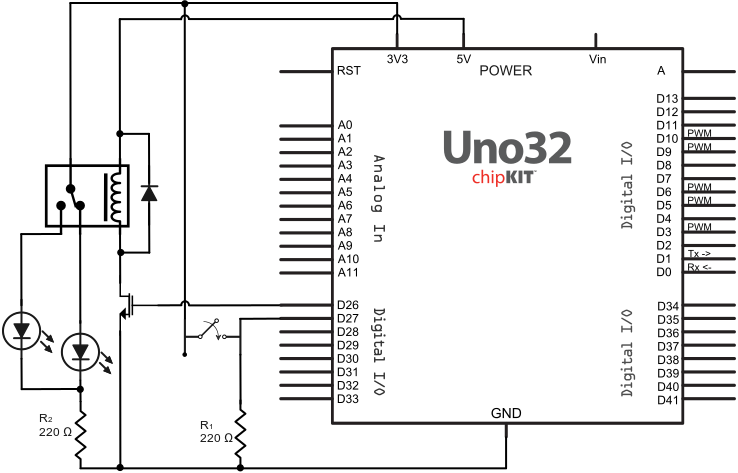
To control when the chipKIT activates or deactivates the transistor, we will wire a push button to act as a toggling input. The circuit and its labelled assembly steps are shown below in Fig 5. Figure 6 illustrates the circuits schematic representation.
- Place the relay near the far left edge of the breadboard and straddle it across the valley. Be sure the relays pins line up with the holes, as shown in Fig. 5.
- Connect the ground pin to the breadboard's blue ground rail.
- Connect the 3.3V source to both red power rails.
- Connect the top 3.3V rail to the relay's switching terminal.
- Place an LED so its anode is connected to the relay's NO terminal.
- Connect a 220 Ω current limiting resistor from ground to the LED's cathode.
- Place another LED (preferably a different color from the last) so its anode is connected to the relay's NC terminal and its cathode connects to the current limiting resistor.
- Place a regular diode across the coil terminal so the cathode (striped side) is facing upward. Note that in this situation, this diode is referred to as a “flyback” diode. The diode is used to dissipate the inductive fly-back generated by the relay's coil. If you are unfamiliar with inductive flyback, follow the red tab to the right.
- Connect the 5V source to the the diode's cathode.
- Next, place an N-FET transistor so its leftmost leg connects to the relay's coil. Make sure the transistor is oriented as shown, otherwise the transistor won't function properly. Also double check that you are using a N-FET and not a P-FET. The N-FET will be labelled “ZVN” while the P-FET will be labelled “ZVP”.
- Connect the transistor's rightmost leg to ground.
- Connect the transistor's center leg to a 220 Ω resistor and connect that resistor to digital pin 28.
- Place a button so it is oriented as shown in Fig. 5.
- Connect the left side of the button to the 3.3V rail.
- Place a resistor that connects the right side of the button to ground.
- Finally, connect a wire from digital pin 27 to the buttons resistor.
Writing the Sketch
With the circuit built we can begin writing the sketch that will control it. The code for the complete sketch will be very simple and is shown below.
int relayControlPin = 28, btn1 = 27;
void setup()
{
 pinMode(relayControlPin, OUTPUT);
 pinMode(btn1, INPUT);
}

/*Define variable that tracks what state the relay is in:
  0 is the default state (no power is applied to the relay's coil)
  1 is the active state  (power is applied to the  relay's coil)*/
boolean relayState = 0;

void loop()
{
  if(digitalRead(btn1))//If button 1 pressed
  {
    while(digitalRead(btn1)){}//Wait for button 1 to be released
    relayState = !relayState;//Invert/toggle relays state
  }
  digitalWrite(relayControlPin, relayState);
}
In the loop function, we begin by looking for a button press to occur. If the button is pressed, a while loop is used to wait for the buttons release. Once the button has been released, the boolean variable relayState will be toggled (inverted). The variable relayState is then used to directly modify the value that is assigned to the relayControlPin (pin 28). When relayState is 0, the chipKIT interpenetrates this as LOW and sets pin 28 LOW. When relayState is 1, the chipKIT interpenetrates this as HIGH and sets pin 28 HIGH. Finally the relayControlPin is then used to indirectly control the relay with a N-FET transistor, as discussed earlier.
Testing the Sketch and Circuit
Once you finish uploading the sketch, the green LED (seen in Fig. 5) should be on by default. This is because it is connected to the relay's NC terminal. Upon pressing the button, the transistor should apply power to the relay's coil. Now that the coil has power to generate a magnetic field, it will push the relay's pole to the NO terminal and produce an audible click. In this state, the yellow LED (seen in Fig. 5) should be on. Pushing the button once more should reverse the process and produces another audible click.
Test Your Knowledge
Now that you've completed this project, you should:
- Replace the flyback diode with an LED. Look for the brief flash generated by the inductive flyback.


